Jul 12, 2024
Previewing the composition – Working with Shape Layers
You’ve created several shape layers using shape tools and the Pen tool, animated them, and used null objects to parent them. It’s time to see how it all comes together.
- Hide all layer properties, and then press F2 to deselect all layers.
- Press the Home key or move the current-time indicator to the beginning of the time ruler.
- Press the spacebar to preview your animation. Press the spacebar again to stop playback.
4.Make any adjustments you need to make. For example, if the leaves protrude from the flowerpot as they rise with the stem, use the Selection tool to adjust their position or rotation, or animate the leaves’ opacity so that they are visible only as they emerge from the pot.
Tip
To rotate a leaf from its tip, use the Pan Behind tool to move its anchor point to the tip.
5.Choose File > Save to save the final project.
Animating layers to match audio
You can time animation to match the beat of an audio file. First you need to create keyframes from the amplitude of the audio (which determines loudness), and then sync the animation to those values.
- To create keyframes from audio amplitude, right-click or Control-click the audio layer in the Timeline panel, and choose Keyframe Assistant > Convert Audio To Keyframes. After Effects adds the Audio Amplitude layer. The new layer is a null object layer, meaning it has no size or shape and won’t appear in a final render. After Effects creates keyframes that specify the amplitude of the audio file in each frame of the layer.
- To sync an animated property with the audio amplitude, select the Audio Amplitude layer, and press E to display the effects properties for the layer. Expand the channel you want to use. Then Alt-click (Windows) or Option-click (macOS) the stopwatch icon for the property whose animation you want to sync with to add an expression; with the expression selected in the time ruler, click the pick whip icon (
) on the Expression:[property name] line, and drag it to the Slider property name in the Audio Amplitude layer. When you release the mouse, the pick whip snaps, and the expression in the shape layer time ruler now means that the property values for the layer will depend on the Slider values of the Audio Amplitude layer.
Review questions
1 What is a shape layer, and how do you create one?
2 How can you create multiple copies of a layer, including all of its properties?
3 How can you snap one layer to another?
4 What does the Pucker & Bloat path operation do?
Review answers
1 A shape layer is simply a layer that contains a vector graphic called a shape. To create a shape layer, draw a shape directly in the Composition panel, using any of the drawing tools or the Pen tool.
2 To duplicate a layer, select it, and choose Edit > Duplicate or press Ctrl+D (Windows) or Command+D (macOS). All of the original layer’s properties, keyframes, and other attributes are included in the new layer.
3 To snap one layer to another in the Composition panel, select Snapping in the options section of the Tools panel. Then click next to the handle or point you want to use as a snapping feature, and drag the layer close to the point to which you want to align it. After Effects highlights the points to which it will align when you release the mouse button.
4 Pucker & Bloat pulls the vertices of a path outward while curving the segments inward (puckering), or pulls the vertices inward while curving the segments outward (bloating). You can animate the degree of pucker or bloat over time.
More DetailsJun 3, 2024
Using nulls to connect points – Working with Shape Layers
You’ve learned that parenting connects one layer to another. Sometimes you want to connect a single point to another layer—for example, the top of the stem in your animation to the flower itself. The Create Nulls From Paths panel lets you do just that. A null object is an invisible layer that has all the same properties as other layers so that it can serve as a parent to any layer. The Create Nulls From Paths panel creates null objects based on specific points, which you can then parent to other layers without having to write complex expressions.
There are three options in the Create Nulls From Paths panel: Points Follow Nulls creates nulls that control the position of the path points; Nulls Follow Points creates nulls that are controlled by the positions of the path points; and Trace Path creates a single null with its position linked to the coordinates of the path.
Note
The Create Nulls From Paths panel works only with masks or with Bezier shapes (shapes drawn with the Pen tool). To convert a shape drawn with a shape tool to a Bezier path, expand the shape layer contents, right-click the path (e.g., Rectangle 1), and choose Convert To Bezier Path.
You’ll create a null for the point at the top of the stem, and then you’ll join that null to the flower so the two remain connected even as the flower moves.
- Go to 4:20 so you can see the stem and leaves well.
- Choose Window > Create Nulls From Paths.jsx.
- Expand the Stem layer in the Timeline panel, and then expand Contents > Shape 1 > Path 1.
- Select Path.
You must select a path in the Timeline panel in order to create a null using the options in the Create Nulls From Paths panel.
5.Click Points Follow Nulls in the Create Nulls From Paths panel.
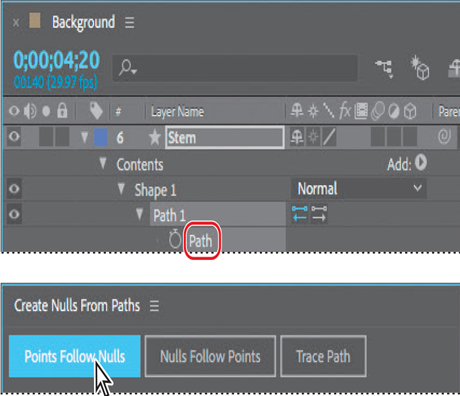
After Effects creates two nulls, corresponding to the two points on the stem path. The null objects appear in gold in the Composition panel, and as layers named Stem: Path 1 [1.1.0] and Stem: Path 1 [1.1.1] in the Timeline panel. You only need the null for the top point.
Note
After you create the nulls, you can close the Create Nulls From Paths panel, or you can leave it open.
6.Select the null that corresponds to the bottom point of the stem, and delete it.
7.In the Timeline panel, drag the pick whip () from the Stem: Path 1 [1.1.1] layer to the Falling Star layer.

8.Move the current-time indicator across the time ruler to see how the stem connects to the flower.
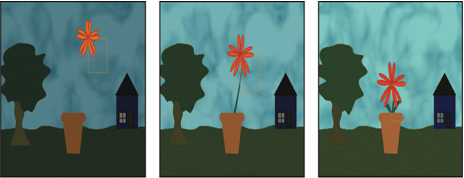
You’ll animate the flower subtly, and the stem will move with it.
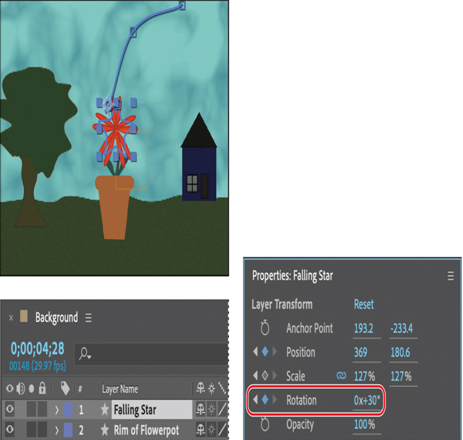
9.Go to 4:28, and use the Selection tool to move the flower a bit to the right as if it had been moved by the wind.
10.Select the Falling Star layer. Go to 4:20, and click the stopwatch icon () next to the Rotation property in the Properties panel to create an initial keyframe at its original rotation. Go to 4:28, and change the rotation to 30°.
11.Choose File > Save to save your work.
Mar 26, 2024
Animating position and scale – Working with Shape Layers
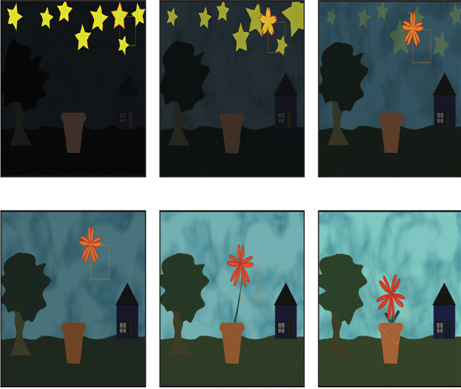
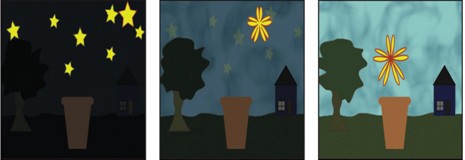
The star becomes a flower, but it should be falling as it changes. You’ll animate its position and scale now.
- Press the Home key or move the current-time indicator to the beginning of the time ruler.
- Select the Falling Star layer in the Timeline panel. In the Properties panel, click the stopwatch icon (
) next to the Position and Scale properties to create initial keyframes at their current values.
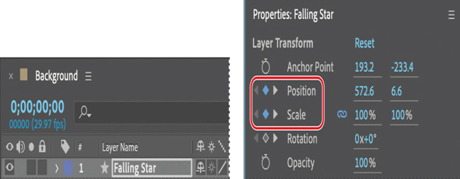
3. Go to 4:20. Select the Selection tool. Then move the star to the center of the screen, hovering above the flowerpot between the tree and the house, so that it’s in its final position. (You may need to deselect Snapping in the Tools panel to position the flower where you want it.) At this point, the star has become a flower, but it hasn’t changed size.

After Effects creates a Position keyframe.
4. Go to 4:01. Increase the Scale value so that the flower is about the width of the flowerpot. The value you use depends on the original size of the star and on the width of the flowerpot.
5. Press the spacebar to preview the animation. The star falls as it becomes a flower, but its trajectory is straight. You want it to fall in a slight arc. Press the spacebar again to stop playback.
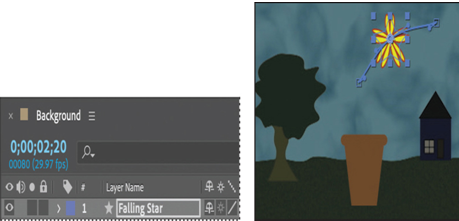
6. Go to 2:20, and adjust the star’s position up, so that its path becomes a gentler arc.
7. Press the spacebar to preview the star’s path again, and then press the spacebar to stop playback. If you want to change the path, you can add Position keyframes at other points in the time ruler.
8. Hide the properties for the Falling Star layer.
Animating fill color
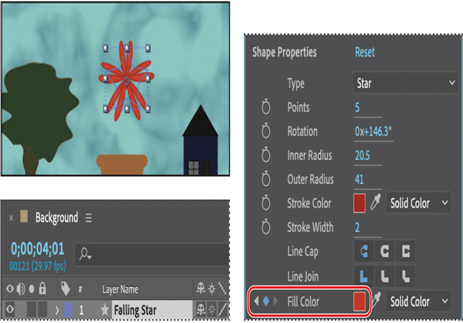
Currently, the star remains yellow with a red stroke as it becomes a flower. You’ll animate its fill color so that the final flower is red.
- Press the Home key or move the current-time indicator to the beginning of the time ruler.
- Select the Falling Star layer, and then click the stopwatch icon (
) next to the Fill Color property in the Properties panel to create an initial keyframe.
- Go to 4:01, and change the fill color to a red color. (We used R=192, G=49, B=33.)
4. Hide all layer properties. Press F2 or click an empty area in the Timeline panel to deselect all layers.
5. Press the spacebar to preview your animation. Press the spacebar again to stop playback. Then, choose File > Save to save your work so far.
More DetailsFeb 2, 2024
Animating a path operation – Working with Shape Layers
Animating a shape
You can animate the Position, Opacity, and other Transform properties of shape layers just as you animate them in other layers. But shape layers provide additional opportunities for animation, including fills, strokes, paths, and path operations.
You’ll create another star, and then use the Pucker & Bloat path operation to transform it into a flower as it falls toward the flowerpot and changes color.
Animating a path operation
Path operations are similar to effects. They modify a shape’s path while preserving the original path. Path operations are live, so you can modify or remove them at any time. You used the Wiggle Paths path operation and Offset Paths earlier. Now you’ll apply a Pucker & Bloat path operation.
Pucker & Bloat pulls the vertices of a path outward while curving the segments inward (puckering), or pulls the vertices inward while curving the segments outward (bloating). You can animate the degree of pucker or bloat over time.
- Press the Home key or move the current-time indicator to the beginning of the time ruler.
- Select the Star tool (
), hidden behind the Rounded Rectangle tool (
) in the Tools panel, and draw another star in the upper right area of the sky.
After Effects adds a Shape Layer 1 layer to the Timeline panel.
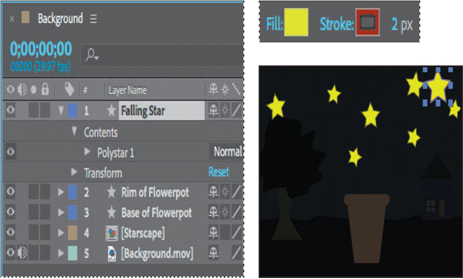
3. Click the Fill Color box, and change the fill color to the same bright yellow you used for the other stars. (We used R=215, G=234, B=23.) Then click OK.
4. Click the Stroke Color box, change the stroke color to a red color (we used R=159, G=38, B=24), and then click OK.
After Effects automatically changes the stroke options from None to Solid Color when you change the stroke color.
5. Select the Shape Layer 1 layer, press Enter or Return, change its name to Falling Star, and press Enter or Return again.
6. In the Timeline panel, choose Pucker & Bloat from the Add pop-up menu in the Falling Star layer.
7. Expand the Pucker & Bloat 1 properties in the Timeline panel.
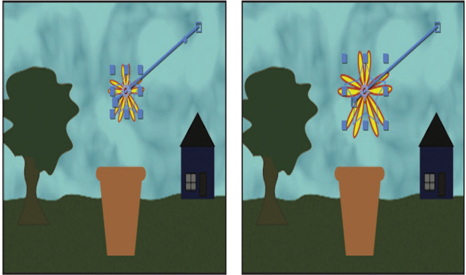
8. Change the Amount to 0, and click the stopwatch icon () to create an initial keyframe.
9. Go to 4:01, and change the amount to 139.
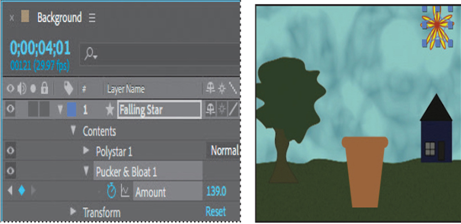
The star shape becomes a flower. After Effects creates a keyframe.
More DetailsNov 18, 2023
Duplicating a shape – Working with Shape Layers
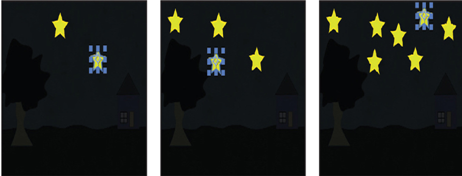
The sky should have more than one star, and they should all shimmer. You’ll duplicate the star you created multiple times so that each of the new layers has the same properties as the original. Then you’ll adjust each star’s position and rotation separately. Finally, you’ll animate the offset paths to accentuate the twinkling effect.
- Press the Home key or move the current-time indicator to the beginning of the time ruler.
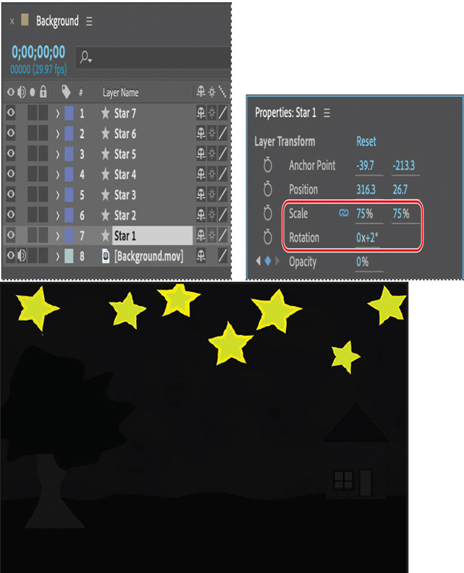
- Select the Star 1 layer in the Timeline panel.
- Choose Edit > Duplicate.
After Effects adds a Star 2 layer at the top of the layer stack. It is identical to the Star 1 layer, including its position.
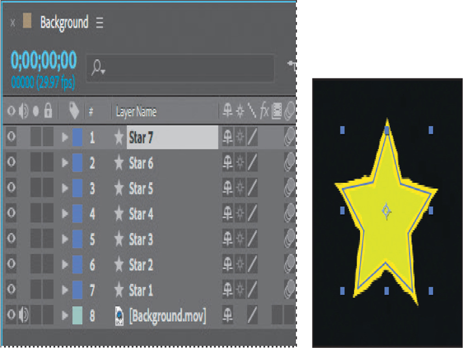
4. Press Ctrl+D (Windows) or Command+D (macOS) five times to create five additional star layers.
5. Select the Selection tool () in the Tools panel, and press F2 to deselect all layers in the Timeline panel.
Adjusting the position, scale, and rotation of each shape
The stars you created are all on top of each other. You’ll customize the position, scale, and angle of rotation for each.
- Using the Selection tool, drag each star to a different position in the sky.
2. Select the Star 1 layer, and then adjust its Rotation and Scale values in the Properties panel.
3. Adjust the Rotation and Scale values for each of the other layers to create variation among the stars. You can also use the Selection tool to adjust the stars’ positions.
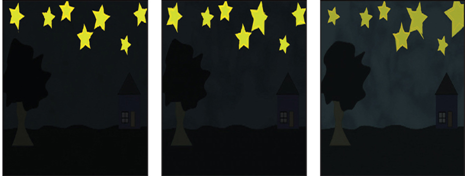
4. Press the spacebar to preview the animation. The stars twinkle and fade as night turns to day. Press the spacebar again to stop the playback.
Animating concentric shapes
You’ll enhance the twinkling effect by animating the stroke for each star.
- Press the Home key or move the current-time indicator to the beginning of the time ruler.
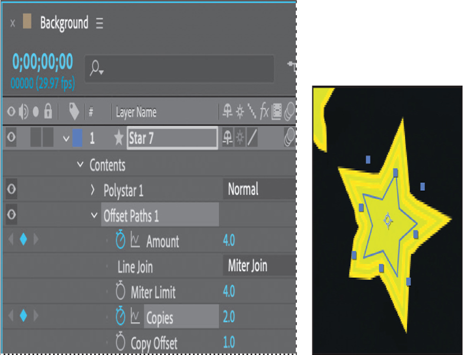
- Expand the properties for the Star 7 layer, and then choose Offset Paths from the Add menu.
The selected star expands in the Composition panel; its stroke has been repeated multiple times.
3. Expand the Offset Paths 1 properties in the Timeline panel.
4. Reduce the Amount to 4, and increase Copies to 2.
The Amount value determines how much the shape expands; positive values expand the stroke outward, and negative values send it inward. Increase the number of Copies to add repetition.
5. Click the stopwatch icon () next to the Amount and Copies properties to create initial keyframes.
6. Go to 0:10, and change the Copies to 3. Then, go to 1:00, and change the Amount to 1 and the Copies to 1.
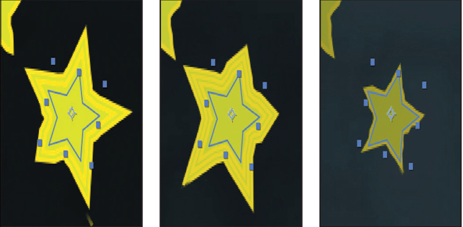
7. Repeat steps 2–6 for each of the other stars, varying the timing and settings so that they expand and contract at different times.
8. Hide the properties for all layers. Then select the Star 1 layer and Shift-select the Star 7 layer to select all the star layers.
9. Choose Layer > Pre-compose, name the new composition Starscape, and click OK.
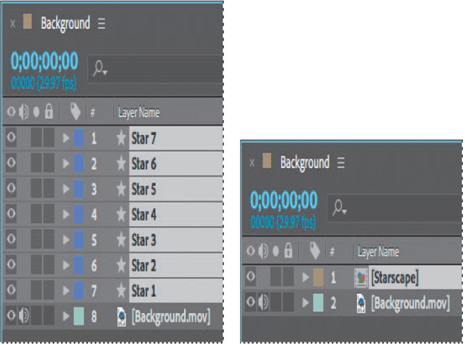
After Effects creates a new composition named Starscape that contains the seven star shapes; the new composition replaces the layers in the Background composition. You can continue to edit the star layers by opening the Starscape composition, but precomposing the layers keeps the Timeline panel organized.
10. Choose File > Save to save your work so far.
Apr 5, 2023
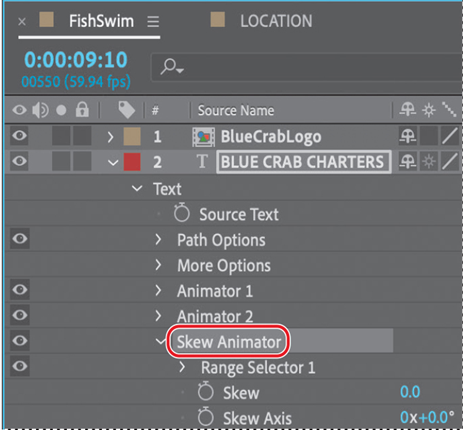
Skewing the range of text – Animating Text
Now, you’ll make that middle word shake and shimmy by setting Skew keyframes.
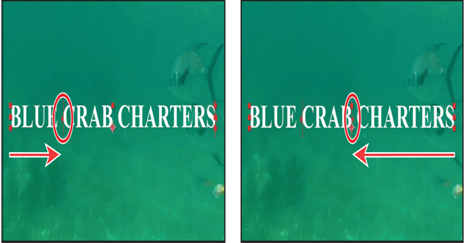
- Drag the Skew Animator’s Skew value left and right, and notice that only the selected word sways. The other words in the line of text remain steady.
- Set the Skew Animator’s Skew value to 0.
- Go to 9:15, and click the stopwatch icon (
) for Skew to add a keyframe to the property.
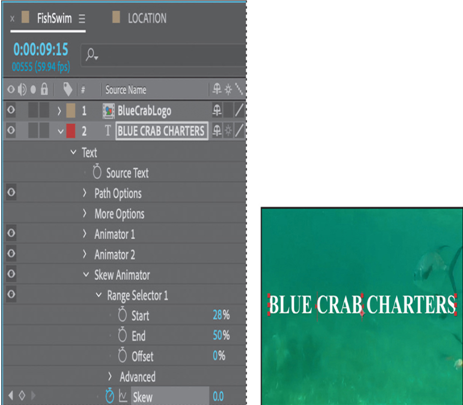
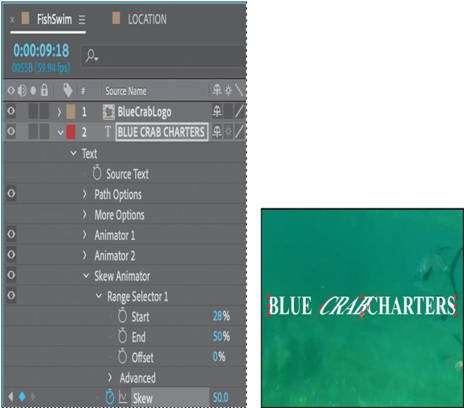
4. Go to 9:18, and set the Skew value to 50. After Effects adds a keyframe.
5. Go to 9:25, and change the Skew value to −50. After Effects adds another keyframe.
6. Go to 10:00, and change the Skew value to 0 to set the final keyframe.
7. Click the Skew property name to select all of the Skew keyframes. Then choose Animation > Keyframe Assistant > Easy Ease to add an Easy Ease to all keyframes.
8. Hide the properties for the BLUE CRAB CHARTERS layer in the Timeline panel.
Tip
To quickly remove all text animators from a text layer, select the layer in the Timeline panel, and choose Animation > Remove All Text Animators. To remove only one animator, select its name in the Timeline panel, and press Delete.
9. Press Home, or go to 0:00, and then preview the entire composition.
10. Press the spacebar to stop playback, and then choose File > Save to save your work.
Animating a layer’s position
You’ve used several text animation presets to dazzle your audience. For a simpler effect, you can animate the Transform properties for a text layer, just as you can any other layer.
Currently, the company logo appears onscreen, but there’s no context for it. You’ll add the words Providing Excursions Daily, animating them so that they move into position as the company name is appearing onscreen.
- In the FishSwim Timeline panel, go to 11:30.
At this point, all the other text is onscreen, so you can position the “Providing Excursions Daily” line accurately.
2. Select the Horizontal Type tool ().
3. Make sure no layers are selected, and then click in the Composition panel. Make sure you’re clicking in an area that doesn’t overlap an existing text layer.
Tip
To make sure no layers are selected, click an empty area in the Timeline panel, press F2, or choose Edit > Deselect All.
4. Type Providing Excursions Daily.
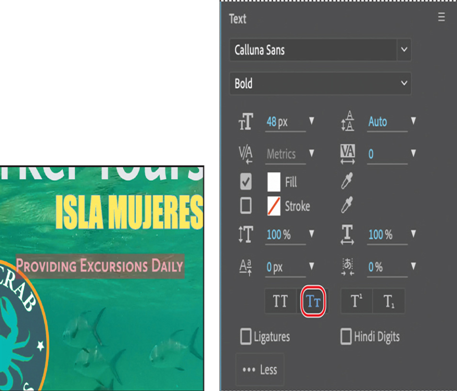
5. Select the text you just typed. Then, in the Properties panel, choose Calluna Sans Bold from the Font Family menu. Set the Font Size to 48 px.
6. Make sure the Fill Color box is set to white.
7. Click More to see additional options. Then select Small Caps. Leave all other options at their default settings.
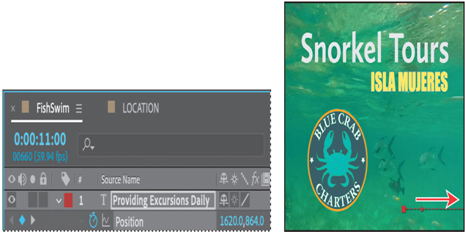
8. Select the Selection tool (), and then drag the Providing Excursions Daily layer so that the text is aligned with the bottom of the logo and the right edge of Snorkel Tours.
9. In the Properties panel, click the stopwatch icon () next to the Position property to create an initial keyframe for the layer.

10.Go to 11:00, the point where the logo has replaced the company name.
11. Drag the Providing Excursions Daily layer off the right edge of the composition. Press the Shift key as you drag to create a straight path.
12. Preview the animation, and then hide all layer properties.

It’s simple, but effective. The text moves in from the right side and stops in its final position beside the logo.
More DetailsMar 13, 2023
Using a text animator group – Animating Text
Text animator groups let you animate individual letters within a block of text in a layer. You’ll use a text animator group to draw attention to BLUE CRAB CHARTERS, animating only the characters in the middle word without affecting the tracking and opacity animation of the other characters in the layer.
- In the Timeline panel, go to 9:10.
- Expand the BLUE CRAB CHARTERS layer to see its Text property group name.
- Select the BLUE CRAB CHARTERS layer, and make sure only the layer name is selected.
- Next to the Text property group name, click the Animate pop-up menu, and choose Skew.
After Effects adds a property group named Animator 3 to the layer’s Text properties.
5. Select Animator 3, press Enter or Return, and rename it Skew Animator. Then press Enter or Return again to accept the new name.
Now you’re ready to define the range of letters that you want to skew.
6. Expand the Skew Animator’s Range Selector 1 properties.
Each animator group includes a default range selector. Range selectors constrain the animation to particular letters in the text layer. You can add selectors to an animator group, or apply multiple animator properties to the same range selector.
7. While watching the Composition panel, drag the Skew Animator’s Range Selector 1 Start value up (to the right) until the left selector indicator () is just before the C in CRAB.
8. Drag the Skew Animator’s Range Selector 1 End value down (to the left) until its indicator () is just after the B in CRAB in the Composition panel.
Now, any properties that you animate with the Skew Animator will affect only the characters that you selected.
About text animator groups
A text animator group includes one or more selectors and one or more animator properties. A selector is like a mask—it specifies which characters or section of a text layer you want an animator property to affect. Using a selector, you can define a percentage of the text, specific characters in the text, or a specific range of text.
Using a combination of animator properties and selectors, you can create complex text animations that would otherwise require painstaking keyframing. Most text animations require you to animate only the selector values, not the property values. Consequently, text animators use a small number of keyframes even for complex animations.
For more information about text animator groups, see After Effects Help.
More DetailsFeb 7, 2023
Animating an imported image – Animating Text
Animating an image to replace text
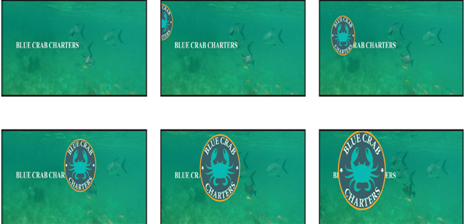
You’ve used several animation presets to change the way text appears onscreen. Now you’ll use one to make text disappear. You’ll import a logo, and animate it to swoop in and appear to erase the BLUE CRAB CHARTERS text, replacing it.
Animating an imported image
First you’ll import the logo and animate its position.
- Click the Project tab to bring the Project panel forward, and then double-click an empty area in the Project panel to open the Import File dialog box.
- Select the BlueCrabLogo.psd file in the Lessons/Lesson03/Assets folder. Choose Composition – Retain Layer Sizes from the Import As menu. (In macOS, you may need to click Options to see the Import As menu.) Then click Import or Open.
- In the BlueCrabLogo.psd dialog box, select Editable Layer Styles, and click OK.
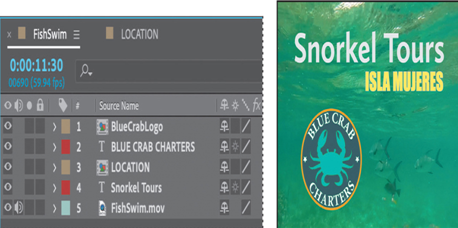
- Drag the BlueCrabLogo composition into the Timeline panel, placing it at the top of the layer stack.
The logo is centered on the screen, but you want it to enter from the left and move down to replace Blue Crab Charters. You’ll animate the layer’s Position and Scale properties to do that.
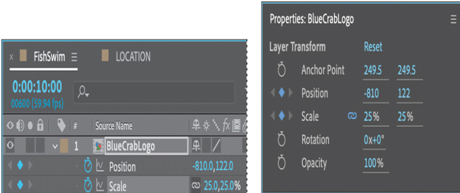
5. Move the current-time indicator to 10:00.
6. With the BlueCrabLogo layer selected, change the Position values to –810, 122, and the Scale to 25% in the Properties panel. Then click the stopwatch icon () next to each of those properties to create initial keyframes.
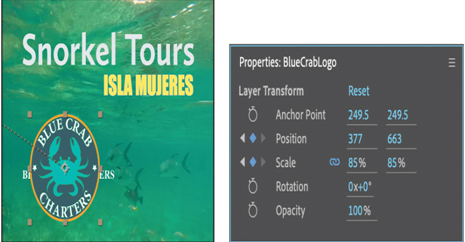
7. Go to 11:00, and change the Position to 377, 663, and the Scale to 85%. After Effects creates keyframes for the properties.
The logo moves into position, but you want it to swoop in, rather than moving in a straight line. You’ll add some intermediate Position keyframes.
8. Go to 10:15, and change the Position to 139, 633.
9. Go to 10:30, and change the Position to 675, 633.
10. Go to 10:00, and press the spacebar to preview the animation. Press the spacebar again to stop the preview, and then hide all layer properties.
Applying an animation preset
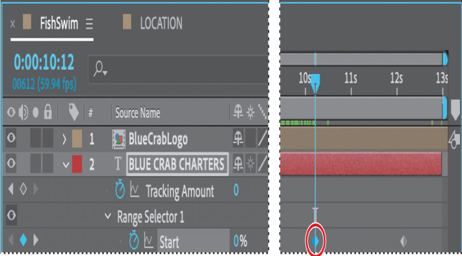
The logo swoops in. Now you’ll apply an animation preset to make it appear that the logo is erasing the text as it arrives.
- Go to 10:10, and select the BLUE CRAB CHARTERS layer.
- In the Effects & Presets panel, search for Fade Out By Character.
- Double-click the Fade Out By Character preset to apply it to the layer.
- With the BLUE CRAB CHARTERS layer selected, press U to see its animated properties.
- Go to 10:12.
- Move the first Range Selector 1: Start keyframe to 10:12.
7. Go to 10:29, and move the second Range Selector 1: Start keyframe to 10:29.
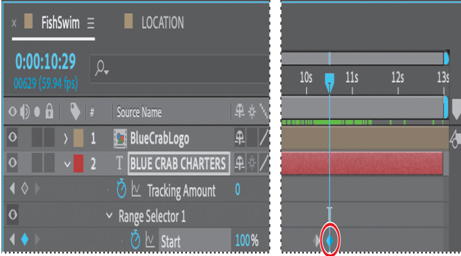
8. Press the spacebar to preview your project, and then press the spacebar again to stop the preview.

9. Press U to hide the layer properties, and save your work.
More DetailsDec 18, 2022
Applying a tracking preset – Animating Text
First you’ll create the text, and then you’ll add a tracking preset.
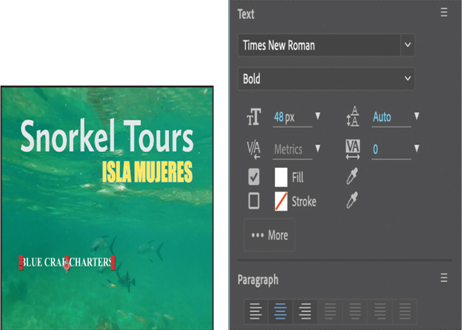
- Select the Horizontal Type tool (
), and then type BLUE CRAB CHARTERS.
- Select the BLUE CRAB CHARTERS layer. In the Properties panel, choose Times New Roman Bold from the Font Family menu, choose 48 px from the Font Size menu, set the Fill to white, and deselect Stroke. In the Paragraph section of the panel, make sure Center Text is selected.
- Go to 7:10.
- Use the Selection tool (
) to move the BLUE CRAB CHARTERS layer down to the lower third of the screen, aligned with Snorkel Tours, as in the image below.
5. Open the Effects & Presets panel. Then type Increase Tracking in the search box, and double-click the preset to apply it to the BLUE CRAB CHARTERS layer.
6. Drag the current-time indicator across the time ruler between 7:10 and 9:10 to manually preview the tracking animation.

Customizing the tracking animation preset
The text expands, but you want the letters to be so close initially that they’re nearly on top of each other, and then to expand to a reasonable, readable distance apart. The animation should also occur more quickly. You’ll adjust the Tracking Amount to achieve both goals.
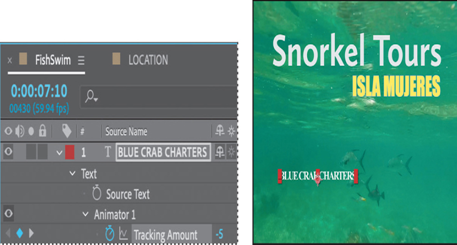
- Select the BLUE CRAB CHARTERS layer in the Timeline panel, and press UU to reveal the properties that were modified.
- Go to 7:10.
- Under Animator 1, change the Tracking Amount to −5 so that the letters are squeezed together.
4. Click the Go To Next Keyframe arrow () for the Tracking Amount property, and then change the value to 0.
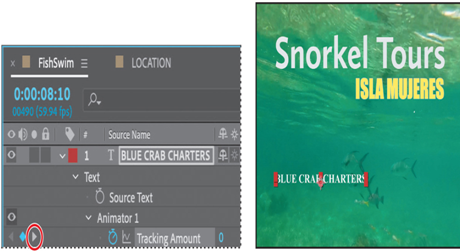
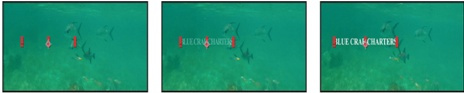
5. Drag the current-time indicator across the time ruler between 7:10 and 8:10. The letters expand, and stop animating at the last keyframe.
6. Hide the properties for all layers.
Animating text opacity
You’ll take the animation of the company name a little further by having it fade onscreen as the letters expand. To do this, you’ll animate the layer’s Opacity property.
- Make sure the BLUE CRAB CHARTERS layer is selected.
- Go to 7:10. In the Properties panel, set the Opacity to 0%. Then click the stopwatch icon (
) to set an Opacity keyframe.
- Go to 7:20, and set the Opacity to 100%. After Effects adds a second keyframe.
Now the letters of the company name will fade in as they expand onscreen.
4. Drag the current-time indicator across the time ruler between 7:10 and 8:10 to see the letters of the company fade in as they spread out.
5. Right-click (Windows) or Control-click (macOS) the ending Opacity keyframe, and choose Keyframe Assistant > Easy Ease In.
6. Choose File > Save.
More DetailsNov 22, 2022
Animating text to appear over time– Animating Text
You want the letters of the location—ISLA MUJERES—to flow organically onto the screen under the activity title. The easiest way to do this is to use another text animation preset.
- Go to 5:00 in the timeline. At that point, the title has finished scaling to its final size.
- Select the LOCATION layer in the Timeline panel.
- Press Ctrl+Alt+Shift+O (Windows) or Command+Option+Shift+O (macOS) to jump to Adobe Bridge.
- Navigate to the Presets/Text/Animate In folder.
- Select the Raining Characters In animation preset, and watch it in the Preview panel. This effect works well to reveal the text gradually.
- Right-click or Control-click the Raining Characters In preset, and choose Place In Adobe After Effects 2024 to apply it to the LOCATION layer, and then return to After Effects.
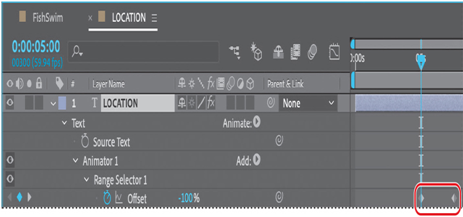
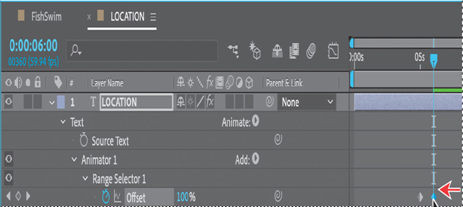
- With the LOCATION layer selected in the Timeline panel, press UU to see the properties modified by the animation preset. You should see two keyframes for Range Selector 1 Offset: one at 5:00 and one at 7:15.
Note
The Raining Characters In preset changes the color of the text, which is fine for this project.
The U key, sometimes referred to as the Überkey, is a valuable keyboard shortcut that reveals all the animated properties of a layer. Press it once to see the animated properties; press it twice to view all modified properties.
You have a lot of animation to fit into this composition, so you’ll speed up the effect.
8. Go to 6:00, and then drag the second Range Selector 1 Offset keyframe to 6:00.
Tip
Press the Shift key while you move the keyframe to ensure it moves to the current time.
9. Select the LOCATION layer, and press U to hide the modified properties.
10. Select the FishSwim tab in the Timeline panel to make that timeline active, and then go to 6:00, if you’re not there already.
11. Use the Selection tool () to move the LOCATION layer so that ISLA MUJERES is right-aligned with and just below Snorkel Tours.
12. Deselect all layers. Drag the current-time indicator across the time ruler from 4:00 to 6:00 to see the letters fall into place. Then save your work so far.

Animating type tracking
Next, you’ll add the company name and then animate its appearance using a text animation tracking preset. By animating tracking, you can make words seem to expand outward as they appear onscreen from a central point.
More Details