Jul 12, 2024
Previewing the composition – Working with Shape Layers
You’ve created several shape layers using shape tools and the Pen tool, animated them, and used null objects to parent them. It’s time to see how it all comes together.
- Hide all layer properties, and then press F2 to deselect all layers.
- Press the Home key or move the current-time indicator to the beginning of the time ruler.
- Press the spacebar to preview your animation. Press the spacebar again to stop playback.
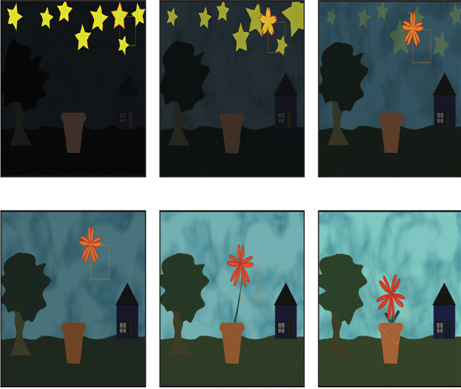
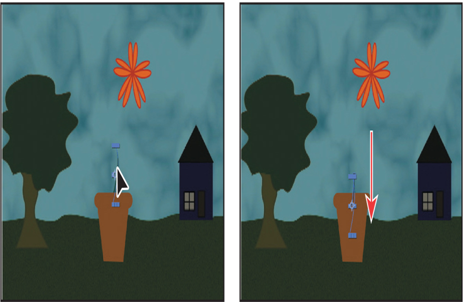
4.Make any adjustments you need to make. For example, if the leaves protrude from the flowerpot as they rise with the stem, use the Selection tool to adjust their position or rotation, or animate the leaves’ opacity so that they are visible only as they emerge from the pot.
Tip
To rotate a leaf from its tip, use the Pan Behind tool to move its anchor point to the tip.
5.Choose File > Save to save the final project.
Animating layers to match audio
You can time animation to match the beat of an audio file. First you need to create keyframes from the amplitude of the audio (which determines loudness), and then sync the animation to those values.
- To create keyframes from audio amplitude, right-click or Control-click the audio layer in the Timeline panel, and choose Keyframe Assistant > Convert Audio To Keyframes. After Effects adds the Audio Amplitude layer. The new layer is a null object layer, meaning it has no size or shape and won’t appear in a final render. After Effects creates keyframes that specify the amplitude of the audio file in each frame of the layer.
- To sync an animated property with the audio amplitude, select the Audio Amplitude layer, and press E to display the effects properties for the layer. Expand the channel you want to use. Then Alt-click (Windows) or Option-click (macOS) the stopwatch icon for the property whose animation you want to sync with to add an expression; with the expression selected in the time ruler, click the pick whip icon (
) on the Expression:[property name] line, and drag it to the Slider property name in the Audio Amplitude layer. When you release the mouse, the pick whip snaps, and the expression in the shape layer time ruler now means that the property values for the layer will depend on the Slider values of the Audio Amplitude layer.
Review questions
1 What is a shape layer, and how do you create one?
2 How can you create multiple copies of a layer, including all of its properties?
3 How can you snap one layer to another?
4 What does the Pucker & Bloat path operation do?
Review answers
1 A shape layer is simply a layer that contains a vector graphic called a shape. To create a shape layer, draw a shape directly in the Composition panel, using any of the drawing tools or the Pen tool.
2 To duplicate a layer, select it, and choose Edit > Duplicate or press Ctrl+D (Windows) or Command+D (macOS). All of the original layer’s properties, keyframes, and other attributes are included in the new layer.
3 To snap one layer to another in the Composition panel, select Snapping in the options section of the Tools panel. Then click next to the handle or point you want to use as a snapping feature, and drag the layer close to the point to which you want to align it. After Effects highlights the points to which it will align when you release the mouse button.
4 Pucker & Bloat pulls the vertices of a path outward while curving the segments inward (puckering), or pulls the vertices inward while curving the segments outward (bloating). You can animate the degree of pucker or bloat over time.
More DetailsMay 14, 2024
Drawing curved shapes – Working with Shape Layers
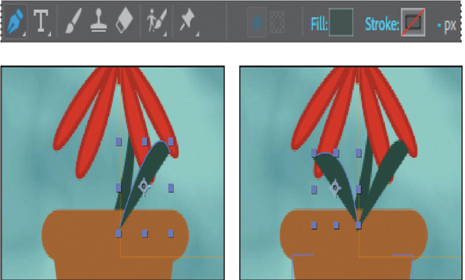
Now you’ll draw leaves with a fill but no stroke, using Bezier handles to round them.
- Go to 4:20, when the flower is in its final position.
- Press F2 or click an empty area of the Timeline panel to deselect all layers. Then select the Pen tool in the Tools panel, click the Fill Color box, select a color that is similar to the green stroke color (we used R=45, G=74, B=63), and click OK. Click the word Stroke, select None in the Stroke Options dialog box, and click OK.
- Click an initial vertex for the leaf near the base of the stem, and then click another for the other end of the leaf. Before you release the mouse, drag the Bezier handle to create a curved leaf.
- Press F2 to deselect the layer, and then repeat step 3 to draw another leaf at the base of the other side of the stem.
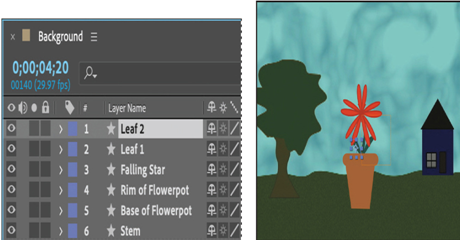
5. Select Shape Layer 1, press Return or Enter, rename it Leaf 1, and then press Return or Enter. Then rename Shape Layer 2 Leaf 2.
Parenting layers
You’ll parent the leaves to the stem so they’ll emerge with it.
- Move the Leaf 1 and Leaf 2 layers beneath the Base of Flowerpot layer and above the Stem layer in the Timeline panel so that the leaves will be behind the flowerpot as they rise.
- Hide all layer properties, and deselect all layers.
- Drag the pick whip (
) from the Leaf 1 layer to the Stem layer, and then drag the pick whip from the Leaf 2 layer to the Stem layer.
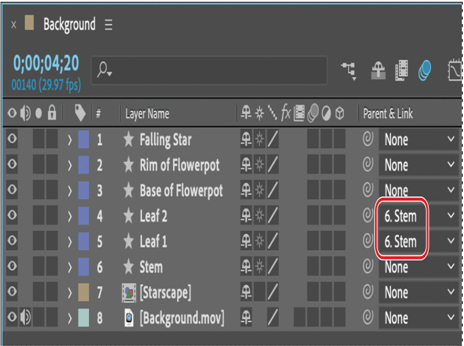
The Leaf 1 and Leaf 2 layers will move in relationship to the Stem layer.
Note
Depending on how you drew your leaves, they may protrude from the flower pot. You’ll have a chance to address that later, if necessary.
The layers aren’t needed until the stem begins to emerge at 3:00, so you’ll set their In point to match the stem’s.
4.Go to 3:00. Select the Leaf 1 layer and Shift-select the Leaf 2 layer. Then press Alt+[ (Windows) or Option+[ (macOS) to set the In point for both of the layers.
About parent and child layers
Parenting assigns one layer’s transformations to another layer, called a child layer. Creating a parenting relationship between layers synchronizes the changes in the parent layer with the corresponding transformation values of the child layers, except opacity. For example, if a parent layer moves 5 pixels to the right of its starting position, then the child layer also moves 5 pixels to the right of its starting position. A layer can have only one parent, but a layer can be a parent to any number of 2D or 3D layers within the same composition. Parenting layers is useful for creating complex animations, such as linking the movements of a marionette or depicting the orbits of planets in the solar system.
For more information on parent and child layers, see After Effects Help.
More DetailsApr 23, 2024
Drawing tapered strokes with the Pen tool – Working with Shape Layers
Animating using parenting
When you parent one layer to another, the child layer adopts the attributes of the parent layer. You’ll draw a stem and leaves to meet the falling star. You can simply parent the leaves and stem to ensure they move together.
Drawing tapered strokes with the Pen tool
First you’ll draw the stem. It will have a slightly thicker stroke than the flower, but no fill, and its tapered end will rise to meet the flower.
- Go to 4:20, when the flower is in its final position.
- Select the Pen tool in the Tools panel.
- Click the word Fill to open the Fill Options dialog box, and then select the None option, and click OK.
- Click the Stroke Color box in the Tools panel, change the stroke color to green (we used R=44, G=73, B=62), and click OK. Change the Stroke Width to 10 px.
- Click just below the rim of the flowerpot to create an initial vertex, and then click at the center of the flower. Before releasing the mouse, drag the Bezier handle to create a subtle curve in the stem.
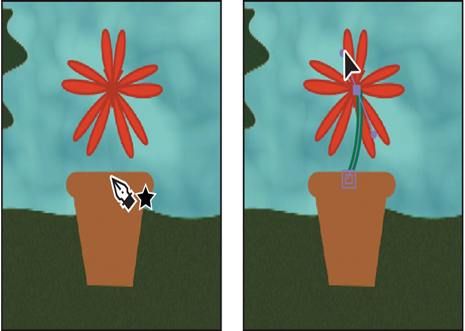
6. Select the Shape Layer 1 layer, press Enter or Return, change its name to Stem, and press Enter or Return again.
7.In the Timeline panel, move the Stem layer below the Base of Flowerpot layer so it’s inside the pot, not outside of it.
8.Expand the Stem layer properties, and then expand Contents > Shape 1 > Stroke 1 > Taper. Change the End Length to 83%.
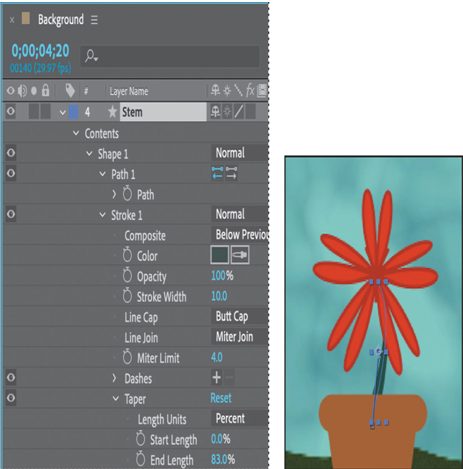
The Length values determine how quickly the stroke tapers. Start Length tapers the stroke at its starting point; End Length tapers the stroke’s end point. Width determines how much the stroke tapers, and Ease determines how sharp the tapered end is.
9. With the Stem layer selected, click the stopwatch icon () next to the Position property in the Properties panel to create an initial keyframe at its final position.
10. Go to 3:00, and press Alt+[ (Windows) or Option+[ (macOS) to set the In point of the layer to the current time.
11. Select the Selection tool () in the Tools panel, and drag the stem down so that it is completely below the top of the flowerpot. Press Shift as you drag to move it straight down.
Tip
If you haven’t already deselected the Snapping option, you may need to deselect it now in order to position the stem where you want it.
The stem will begin to emerge from the pot at 3:00.
12. Hide the properties for the Stem layer.
Jan 30, 2024
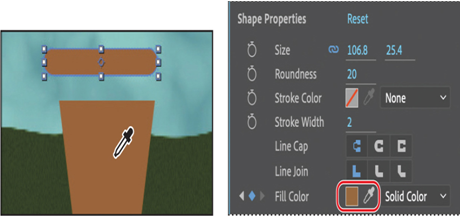
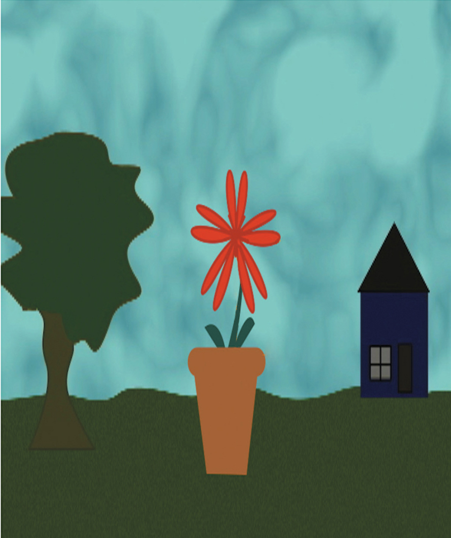
Creating a shape with rounded corners – Working with Shape Layers
You’ll use the Rounded Rectangle tool to create the rim of the flowerpot.
- Go to 1:10.
- Select the Rounded Rectangle tool (
), hidden behind the Star tool (
) in the Tools panel.
- In the Composition panel, drag a shape a little wider than the top of the flowerpot. Draw the shape a little bit above the base of the pot.
- Select Shape Layer 1, press Enter or Return, and change the layer’s name to Rim of Flowerpot. Press Enter or Return to accept the new name.
- Select the Rim of Flowerpot layer.
- If the rim matches the base, skip to step 7. Otherwise, click the eyedropper next to the Fill Color property in the Properties panel, and then click the base of the flowerpot in the Composition panel to sample the color.
- Click the stopwatch icon (
) next to the Fill Color property to create an initial keyframe.
- Go to 4:01, and use the eyedropper to change the fill color to match the lighter brown in the flowerpot base.
9. Hide all layer properties. Press F2 or click an empty area in the Timeline panel to deselect all layers.
Snapping layers into position
The flowerpot layers currently have no relationship to each other in the composition. You’ll use the Snapping option in After Effects to quickly align the layers. When the Snapping option is enabled, the layer feature that is closest to your pointer when you click becomes the snapping feature. As you drag the layer near other layers, features on other layers are highlighted, showing you where the snapping feature would snap if you released the mouse button.
Note
You can snap two shape layers together, but not two shapes within a single layer. Also, a layer must be visible to snap to it. 2D layers can snap to 2D layers, and 3D layers can snap to 3D layers.
- Select the Selection tool (
) in the Tools panel.
- Select Snapping in the options section of the Tools panel, if it’s not already selected.
Tip
If the Snapping option isn’t selected, you can temporarily enable it: Click a layer and start dragging, and then press Ctrl (Windows) or Command (macOS) as you drag the layer.

3. Select the Rim of Flowerpot layer in the Timeline panel.
When you select a layer in the Composition panel, After Effects displays the layer handles and anchor point. You can use any of these points as the snapping feature for a layer.
4. Click near the bottom of the rim, and drag it near the upper edge of the Base of Flowerpot layer until it snaps into place. Be careful not to drag the corner itself, or you’ll resize the layer.
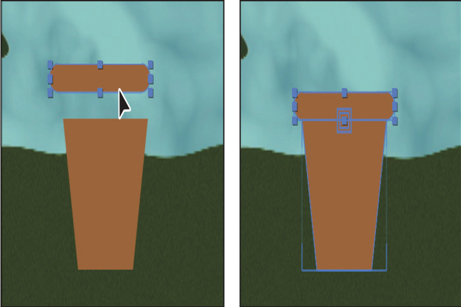
As you drag the layer, a box appears around the handle you selected, indicating that it is the snapping feature.
5. Use the Selection tool to adjust the size of the rim or base of the flowerpot if you need to.
6. Deselect all layers, and choose File > Save to save your work.
More DetailsDec 24, 2023
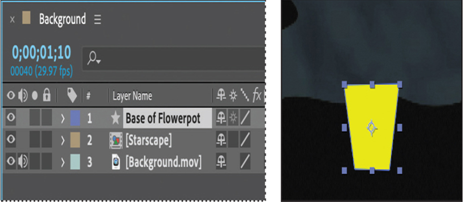
Creating custom shapes with the Pen tool – Working with Shape Layers
You can use the five shape tools to create a wide variety of shapes. However, the real power in using shape layers is that you can draw any shape and manipulate it in a myriad of ways.
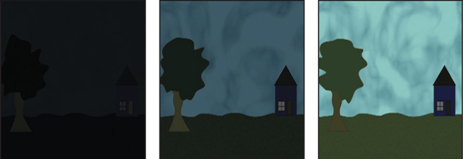
You’ll use the Pen tool to draw a shape that resembles the base of a flowerpot. You’ll also animate its color so that the flowerpot is dark at the beginning of the scene, but gets lighter as the sky lightens.
- Make sure no layers are selected in the Timeline panel, and then go to 1:10.
- Select the Pen tool (
) in the Tools panel.
- In the Composition panel, click an initial vertex, and add three more to draw a shape that resembles the base of a flowerpot, as in the illustration. Click again in the initial vertex to close the shape.

When you create the first vertex, After Effects automatically adds a shape layer—Shape Layer 1—to the Timeline panel.
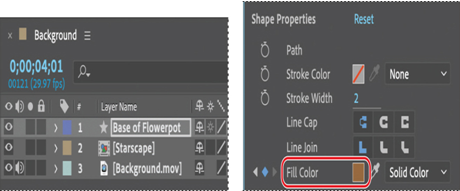
4. Select Shape Layer 1, press Enter or Return, and change the layer’s name to Base of Flowerpot. Press Enter or Return to accept the new name.
5. With the Base of Flowerpot layer selected, click the Fill Color box in the Properties panel, and select a dark brown color (we used R=62, G=40, B=22).
6. Choose None from the menu next to Stroke Color in the Properties panel.
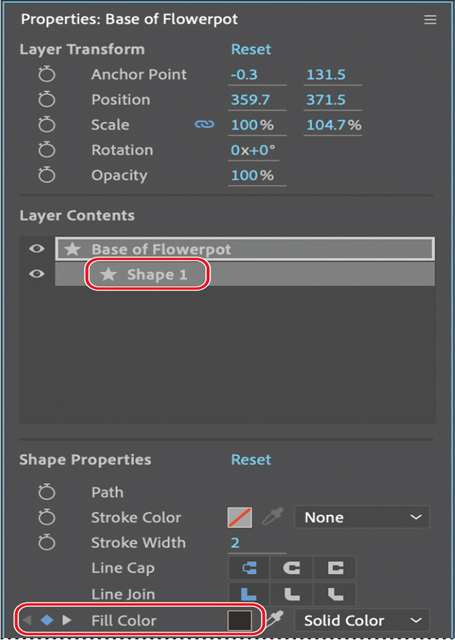
7. In the Properties panel, select Shape 1 in the Layer Contents section.
8. Click the stopwatch icon next to the Fill Color property to create an initial keyframe.
9. Go to 4:01, click the Fill Color box, and change the fill color to a lighter brown. (We used R=153, G=102, B=59.) Then click OK.
10. Hide all layer properties in the Timeline panel. Press F2 or click an empty area in the Timeline panel to deselect all layers.
Positioning layers with snapping
Now you’ll create the rim of the flowerpot and position it atop the base using the snapping feature in After Effects.
More DetailsSep 16, 2023
Creating the composition – Working with Shape Layers
Next, you’ll import the background movie and create the composition.
- Click New Composition From Footage in the Composition panel.
- Navigate to the Lessons/Lesson04/Assets folder on your hard disk, select the Background.mov file, and then click Import or Open.
After Effects adds the Background.mov file to the Project panel. It creates a composition based on the Background.mov file and opens the new composition in both the Timeline and Composition panels.
3. Press the spacebar to preview the background movie. In the scene, night turns to day as the sky lightens and the colors brighten. Press the spacebar again to stop playback.
Adding a shape layer
After Effects includes five shape tools: Rectangle, Rounded Rectangle, Ellipse, Polygon, and Star. When you draw a shape directly in the Composition panel, After Effects adds a new shape layer to the composition. You can apply stroke and fill settings to a shape, modify its path, and apply animation presets. Shape attributes are represented in the Timeline panel; many are also in the Properties panel. You can animate each setting over time.
The same drawing tools can create both shapes and masks. Masks are applied to layers to hide or reveal areas or as input into effects; shapes have their own layers. When you select a drawing tool, you can specify whether the tool draws a shape or a mask.
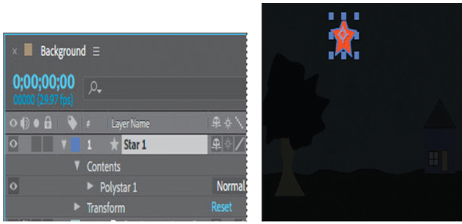
Drawing a shape
You’ll begin by drawing a star.
- Press the Home key or move the current-time indicator to the beginning of the time ruler.
- Press F2 or click an empty area in the Timeline panel to make sure no layers are selected.
If you draw a shape when a layer is selected, the shape becomes a mask for that layer; the cursor displays a masked box () as you start to draw. If you draw a shape when no layer is selected, After Effects creates a shape layer; the cursor displays a star (
) as you start to draw.
3. Choose Edit > Settings > General (Windows) or After Effects > Settings > General (macOS). Select Center Anchor Point In New Shape Layers, and click OK.
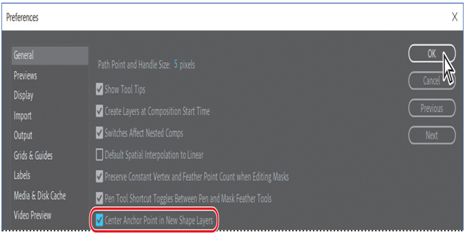
The anchor point is the reference point After Effects uses when it changes a layer’s position, scale, or rotation. By default, a shape layer’s anchor point is at the center of the composition. Selecting Center Anchor Point In New Shape Layers positions the anchor point in the center of the first shape you draw on a layer.
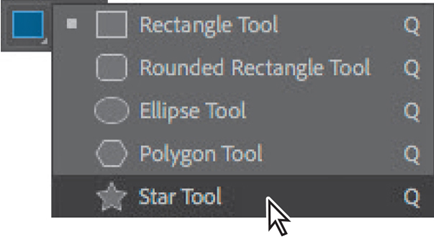
4. Select the Star tool (), hidden behind the Rectangle tool (
) in the Tools panel.
5. Drag a small star in the sky.
The shape appears in the Composition panel, and After Effects adds a shape layer named Shape Layer 1 to the Timeline panel.
6. Select the Shape Layer 1 layer name, press Enter or Return, change the layer name to Star 1, and press Enter or Return to accept the change.
Aug 3, 2023
Getting started – Working with Shape Layers
Lesson overview
In this lesson, you’ll learn how to do the following:
- Create custom shapes.
- Customize a shape’s fill and stroke.
- Use path operations to transform shapes.
- Animate shapes.
- Taper strokes in shapes.
- Snap layers into alignment.
- Use the Create Nulls From Paths panel.
This lesson will take about an hour to complete. If you haven’t already done so, download the project files for this lesson from peachpit.com/AfterEffectsCIB2024, following the instructions in the Getting Started section under “Accessing the lesson files and Web Edition.”
PROJECT: ANIMATED ILLUSTRATION
Shape layers make it easy to create expressive backgrounds and intriguing results. You can animate shapes, apply animation presets, and connect them to other shapes to intensify their impact.
Getting started
Shape layers are created automatically when you draw a shape with any of the drawing tools. You can customize and transform an individual shape or its entire layer to create interesting results. In this lesson, you will use shape layers to create a whimsical animation.
First, you’ll preview the final movie and set up the project.
- Make sure the following files are in the Lessons/Lesson04 folder on your hard disk, or download them from peachpit.com now:
- In the Assets folder: Background.mov
- In the Sample_Movie folder: Lesson04.mp4
- Open and play the Lesson04.mp4 sample movie in Windows Movies & TV or QuickTime Player to see what you will create in this lesson. When you are done, close Windows Movies & TV or QuickTime Player. You may delete the sample movie from your hard disk if you have limited storage space.
As you start After Effects, restore the default application settings. See “Restoring default preferences” on page 3.
3. Start After Effects, and then immediately hold down Ctrl+Alt+Shift (Windows) or Command+Option+Shift (macOS) to restore default preferences settings. In the Startup Repair Options dialog box, click Reset Preferences.
4. Click New Project in the Home window.
After Effects opens to display a blank, untitled project.
5. Choose File > Save As > Save As, and then navigate to the Lessons/Lesson04/Finished_Project folder.
6. Name the project Lesson04_Finished.aep, and then click Save.
More DetailsJun 5, 2023
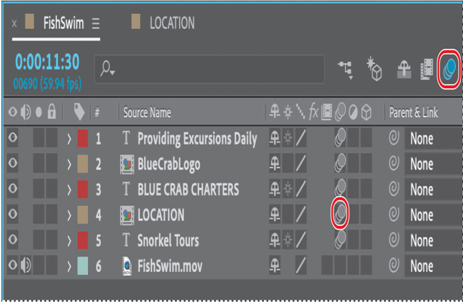
Adding motion blur – Animating Text
Motion blur is the blur that occurs as an object moves. You’ll apply motion blur to finesse the composition and make the movement look more natural.
- In the Timeline panel, click the Motion Blur switch (
) for each layer except the FishSwim and LOCATION layers.
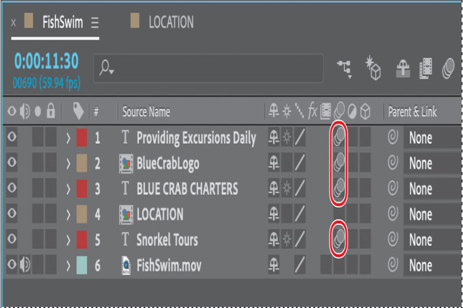
Now you’ll apply motion blur to the layer in the LOCATION composition.
2. Switch to the LOCATION Timeline panel, and enable motion blur for the layer.
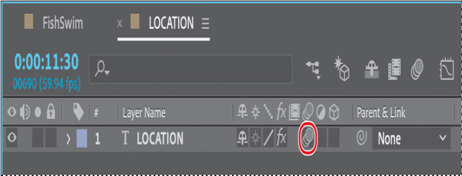
3. Switch back to the FishSwim Timeline panel, and select the Motion Blur switch for the LOCATION layer.
After Effects automatically enables motion blur for the composition when you enable it for any layer.
4. Preview the entire, completed animation.

5. Choose File > Save.
Give yourself a pat on the back. You just completed some hard-core text animations. If you’d like to export the composition as a movie file, see Lesson 15, “Rendering and Outputting,” for instructions.
Review questions
1 What are some similarities and differences between text layers and other types of layers in After Effects?
2 How can you preview a text animation preset?
3 What are text animator groups?
Review answers
1 In many ways, a text layer is just like any other layer in After Effects. You can apply effects and expressions to text layers, animate them, designate them as 3D layers, and edit 3D text while viewing it in multiple views. However, they differ from most layers in that you can’t open text layers in their own Layer panels. Text layers consist entirely of vector graphics, so when you scale the layer or resize the text, it retains crisp, resolution-independent edges. You can animate the text in a text layer using special text animator properties and selectors.
2 You can preview text animation presets in Adobe Bridge by choosing Animation > Browse Presets. Adobe Bridge opens and displays the contents of the After Effects Presets folder. Navigate to folders containing categories of text animation presets, such as Blurs or Paths, and watch samples in the Preview panel.
3 Text animator groups enable you to animate the properties of individual characters in a text layer over time. Text animator groups contain one or more selectors, which are like masks: They let you specify which characters or section of a text layer you want an animator property to affect. Using a selector, you can define a percentage of the text, specific characters in the text, or a specific range of text.
More DetailsApr 5, 2023
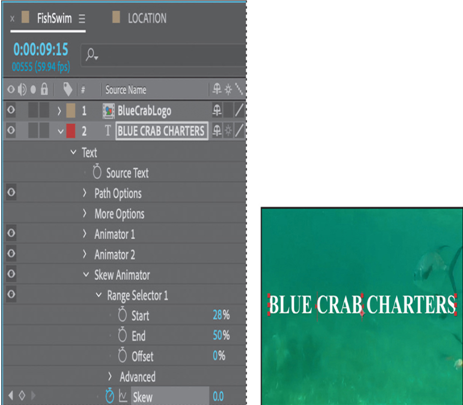
Skewing the range of text – Animating Text
Now, you’ll make that middle word shake and shimmy by setting Skew keyframes.
- Drag the Skew Animator’s Skew value left and right, and notice that only the selected word sways. The other words in the line of text remain steady.
- Set the Skew Animator’s Skew value to 0.
- Go to 9:15, and click the stopwatch icon (
) for Skew to add a keyframe to the property.
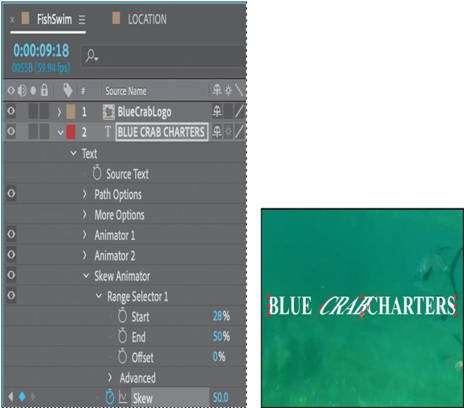
4. Go to 9:18, and set the Skew value to 50. After Effects adds a keyframe.
5. Go to 9:25, and change the Skew value to −50. After Effects adds another keyframe.
6. Go to 10:00, and change the Skew value to 0 to set the final keyframe.
7. Click the Skew property name to select all of the Skew keyframes. Then choose Animation > Keyframe Assistant > Easy Ease to add an Easy Ease to all keyframes.
8. Hide the properties for the BLUE CRAB CHARTERS layer in the Timeline panel.
Tip
To quickly remove all text animators from a text layer, select the layer in the Timeline panel, and choose Animation > Remove All Text Animators. To remove only one animator, select its name in the Timeline panel, and press Delete.
9. Press Home, or go to 0:00, and then preview the entire composition.

10. Press the spacebar to stop playback, and then choose File > Save to save your work.
Animating a layer’s position
You’ve used several text animation presets to dazzle your audience. For a simpler effect, you can animate the Transform properties for a text layer, just as you can any other layer.
Currently, the company logo appears onscreen, but there’s no context for it. You’ll add the words Providing Excursions Daily, animating them so that they move into position as the company name is appearing onscreen.
- In the FishSwim Timeline panel, go to 11:30.
At this point, all the other text is onscreen, so you can position the “Providing Excursions Daily” line accurately.
2. Select the Horizontal Type tool ().
3. Make sure no layers are selected, and then click in the Composition panel. Make sure you’re clicking in an area that doesn’t overlap an existing text layer.
Tip
To make sure no layers are selected, click an empty area in the Timeline panel, press F2, or choose Edit > Deselect All.
4. Type Providing Excursions Daily.
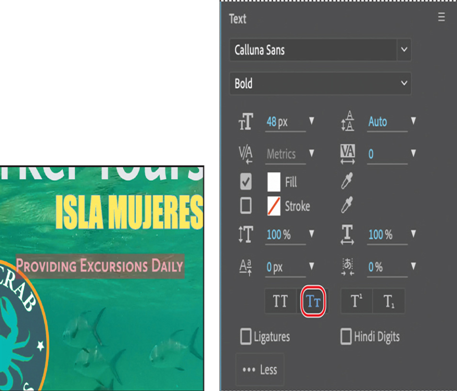
5. Select the text you just typed. Then, in the Properties panel, choose Calluna Sans Bold from the Font Family menu. Set the Font Size to 48 px.
6. Make sure the Fill Color box is set to white.
7. Click More to see additional options. Then select Small Caps. Leave all other options at their default settings.
8. Select the Selection tool (), and then drag the Providing Excursions Daily layer so that the text is aligned with the bottom of the logo and the right edge of Snorkel Tours.
9. In the Properties panel, click the stopwatch icon () next to the Position property to create an initial keyframe for the layer.

10.Go to 11:00, the point where the logo has replaced the company name.
11. Drag the Providing Excursions Daily layer off the right edge of the composition. Press the Shift key as you drag to create a straight path.
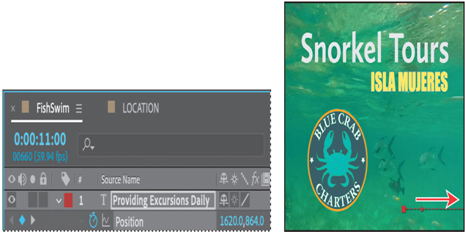
12. Preview the animation, and then hide all layer properties.

It’s simple, but effective. The text moves in from the right side and stops in its final position beside the logo.
More DetailsOct 9, 2022
Importing text – Animating Text
Animating imported Photoshop text
When you just need to add a few words of text to a unique project, it works well to type directly into After Effects. But in the real world, you may need to ensure brand and style consistency among multiple projects. Fortunately, you can import text from Photoshop or Illustrator. You can preserve text layers, edit them, and animate them in After Effects.
Importing text
Some of the remaining text for this composition is in a layered Photoshop file, which you’ll import now.
- Double-click an empty area in the Project panel to open the Import File dialog box.
- Select the LOCATION.psd file in the Lessons/Lesson03/Assets folder. Choose Composition – Retain Layer Sizes from the Import As menu. (In macOS, you may need to click Options to see the Import As menu.) Then click Import or Open.
- In the LOCATION.psd dialog box, select Editable Layer Styles, and click OK.
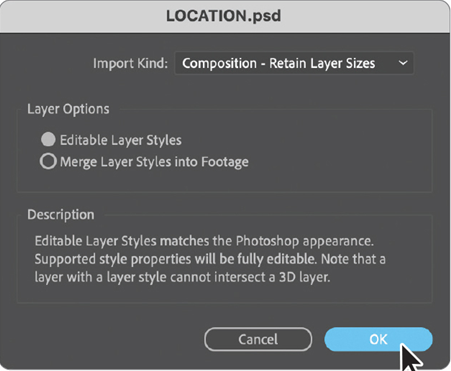
After Effects can import Photoshop layer styles, retaining the appearance of the layers you’re importing. The imported file is added as a composition to the Project panel; its layers are added in a separate folder.
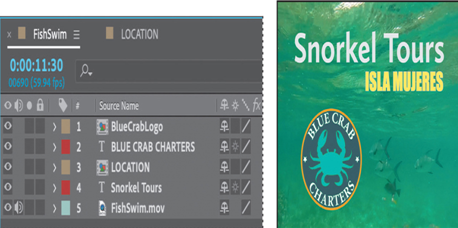
4. Drag the LOCATION composition from the Project panel into the Timeline panel, placing it at the top of the layer stack.
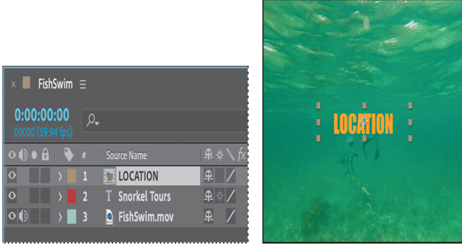
Because you imported the LOCATION.psd file as a composition with layers intact, you can work on it in its own Timeline panel, editing and animating its layers independently.
Editing imported text
The text you imported isn’t currently editable in After Effects. You’ll change that so that you can control the type and apply animations. The LOCATION.psd file is a boilerplate template for the location of company tours. You’ll edit the text and add a stroke to help it stand out for this promotion.
- Double-click the LOCATION composition in the Project panel to open it in its own Timeline panel.
- Select the LOCATION layer in the Timeline panel, and choose Layer > Create > Convert To Editable Text. (Click OK if you see a warning about missing fonts.)
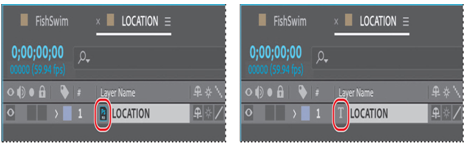
Now the text layer can be edited, so you can customize the tour location.
3. Double-click the LOCATION layer in the Timeline panel to select the text and automatically switch to the Horizontal Type tool ().
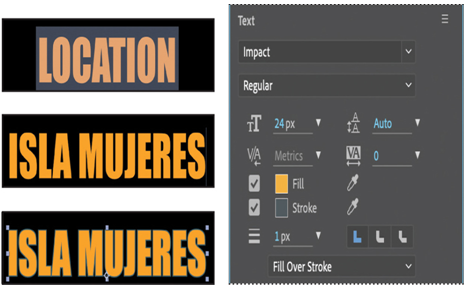
4. Type ISLA MUJERES.
Note
The layer name does not change in the Timeline panel when you change the text in the layer. This is because the original layer name was created in Photoshop. To change a layer’s name, select it in the Timeline panel, press Enter or Return, type the new name, and press Enter or Return again.
5. Switch to the Selection tool () to exit text-editing mode.
6. In the Text section of the Properties dialog box, click the Stroke color box to open it. Select a teal blue color (we used R=70, G=92, B=101), and click OK. Leave all other settings as they are.
7. Choose File > Save to save your work so far.
More Details