Aug 24, 2024
Getting started – Animating a Multimedia Presentation
Lesson overview
In this lesson, you’ll learn how to do the following:
• Create a complex animation with multiple layers.
• Adjust the duration of a layer.
• Animate with Position, Scale, and Rotation keyframes.
• Use parenting to sync the animation of layers.
• Use Bezier curves to smooth a motion path.
• Animate a precomposed layer.
• Apply effects to a solid layer.
• Add color labels to keyframes.
• Fade out audio.
This lesson will take about an hour to complete. If you haven’t already done so, download the project files for this lesson from peachpit.com/AfterEffectsCIB2024, following the instructions in the Getting Started section under “Accessing the lesson files and Web Edition.”

PROJECT: ANIMATED VIDEO
Animation by Lee Daniels, www.leedanielsart.com
Adobe After Effects projects typically use a variety of imported footage, arranged in a composition, that is edited and animated using the Timeline panel. In this lesson, you’ll become more familiar with animation fundamentals as you build a multimedia presentation.
Getting started
In this project, you will animate a hot air balloon floating through the sky. All seems peaceful until a gust of wind blows the balloon’s colorful canvas off to cover the clouds.
- Make sure the following files are in the Lessons/Lesson05 folder on your hard disk, or download them from peachpit.com now:
• In the Assets folder: Balloon.ai, Fire.mov, Sky.ai, Soundtrack.wav
• In the Sample_Movie folder: Lesson05.mp4 - Open and play the Lesson05.mp4 sample movie in Windows Movies & TV or QuickTime Player to see what you’ll create in this lesson. When you are done, close Windows Movies & TV or QuickTime Player. You may delete the sample movie from your hard disk if you have limited storage space.
As you start After Effects, restore the default application settings. See “Restoring default preferences” on page 3. - Start After Effects, and then immediately hold down Ctrl+Alt+Shift (Windows) or Command+Option+Shift (macOS) to restore default preferences settings. In the Startup Repair Options dialog box, click Reset Preferences.
- Click New Project in the Home window.
- Choose File > Save As > Save As.
- In the Save As dialog box, navigate to the Lessons/Lesson05/Finished_Project folder. Name the project Lesson05_Finished.aep, and then click Save.
May 14, 2024
Drawing curved shapes – Working with Shape Layers
Now you’ll draw leaves with a fill but no stroke, using Bezier handles to round them.
- Go to 4:20, when the flower is in its final position.
- Press F2 or click an empty area of the Timeline panel to deselect all layers. Then select the Pen tool in the Tools panel, click the Fill Color box, select a color that is similar to the green stroke color (we used R=45, G=74, B=63), and click OK. Click the word Stroke, select None in the Stroke Options dialog box, and click OK.
- Click an initial vertex for the leaf near the base of the stem, and then click another for the other end of the leaf. Before you release the mouse, drag the Bezier handle to create a curved leaf.
- Press F2 to deselect the layer, and then repeat step 3 to draw another leaf at the base of the other side of the stem.
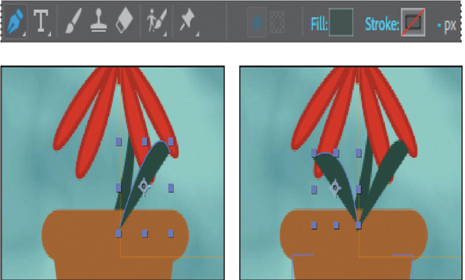
5. Select Shape Layer 1, press Return or Enter, rename it Leaf 1, and then press Return or Enter. Then rename Shape Layer 2 Leaf 2.
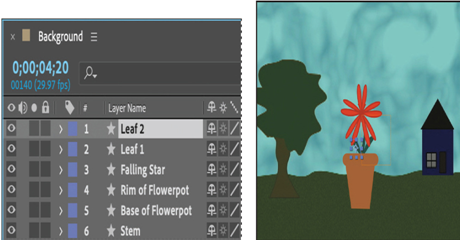
Parenting layers
You’ll parent the leaves to the stem so they’ll emerge with it.
- Move the Leaf 1 and Leaf 2 layers beneath the Base of Flowerpot layer and above the Stem layer in the Timeline panel so that the leaves will be behind the flowerpot as they rise.
- Hide all layer properties, and deselect all layers.
- Drag the pick whip (
) from the Leaf 1 layer to the Stem layer, and then drag the pick whip from the Leaf 2 layer to the Stem layer.
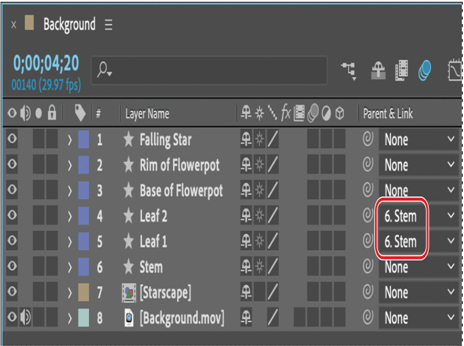
The Leaf 1 and Leaf 2 layers will move in relationship to the Stem layer.
Note
Depending on how you drew your leaves, they may protrude from the flower pot. You’ll have a chance to address that later, if necessary.
The layers aren’t needed until the stem begins to emerge at 3:00, so you’ll set their In point to match the stem’s.
4.Go to 3:00. Select the Leaf 1 layer and Shift-select the Leaf 2 layer. Then press Alt+[ (Windows) or Option+[ (macOS) to set the In point for both of the layers.
About parent and child layers
Parenting assigns one layer’s transformations to another layer, called a child layer. Creating a parenting relationship between layers synchronizes the changes in the parent layer with the corresponding transformation values of the child layers, except opacity. For example, if a parent layer moves 5 pixels to the right of its starting position, then the child layer also moves 5 pixels to the right of its starting position. A layer can have only one parent, but a layer can be a parent to any number of 2D or 3D layers within the same composition. Parenting layers is useful for creating complex animations, such as linking the movements of a marionette or depicting the orbits of planets in the solar system.
For more information on parent and child layers, see After Effects Help.
More DetailsMar 26, 2024
Animating position and scale – Working with Shape Layers
The star becomes a flower, but it should be falling as it changes. You’ll animate its position and scale now.
- Press the Home key or move the current-time indicator to the beginning of the time ruler.
- Select the Falling Star layer in the Timeline panel. In the Properties panel, click the stopwatch icon (
) next to the Position and Scale properties to create initial keyframes at their current values.
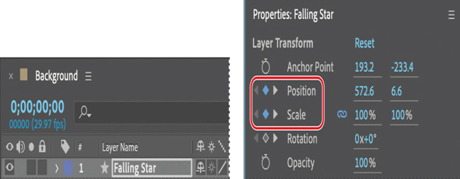
3. Go to 4:20. Select the Selection tool. Then move the star to the center of the screen, hovering above the flowerpot between the tree and the house, so that it’s in its final position. (You may need to deselect Snapping in the Tools panel to position the flower where you want it.) At this point, the star has become a flower, but it hasn’t changed size.
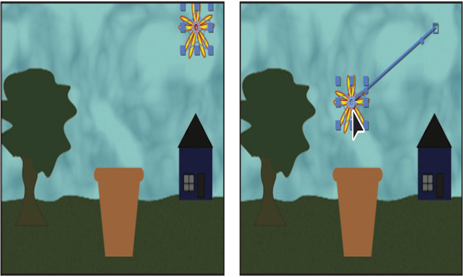
After Effects creates a Position keyframe.
4. Go to 4:01. Increase the Scale value so that the flower is about the width of the flowerpot. The value you use depends on the original size of the star and on the width of the flowerpot.
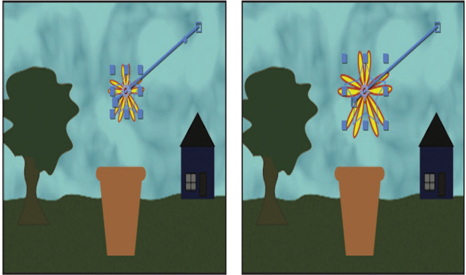
5. Press the spacebar to preview the animation. The star falls as it becomes a flower, but its trajectory is straight. You want it to fall in a slight arc. Press the spacebar again to stop playback.
6. Go to 2:20, and adjust the star’s position up, so that its path becomes a gentler arc.
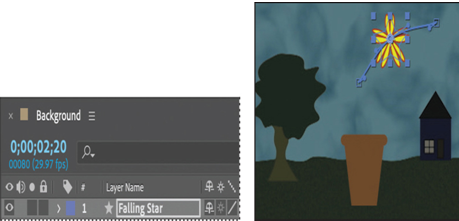
7. Press the spacebar to preview the star’s path again, and then press the spacebar to stop playback. If you want to change the path, you can add Position keyframes at other points in the time ruler.
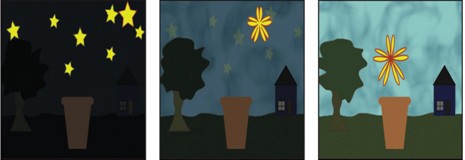
8. Hide the properties for the Falling Star layer.
Animating fill color
Currently, the star remains yellow with a red stroke as it becomes a flower. You’ll animate its fill color so that the final flower is red.
- Press the Home key or move the current-time indicator to the beginning of the time ruler.
- Select the Falling Star layer, and then click the stopwatch icon (
) next to the Fill Color property in the Properties panel to create an initial keyframe.
- Go to 4:01, and change the fill color to a red color. (We used R=192, G=49, B=33.)
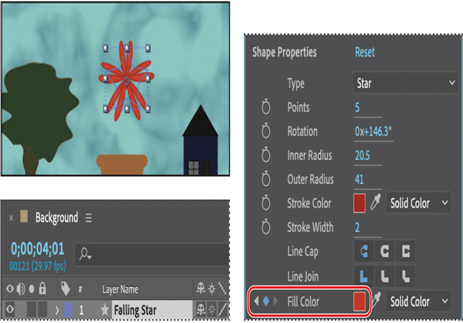
4. Hide all layer properties. Press F2 or click an empty area in the Timeline panel to deselect all layers.
5. Press the spacebar to preview your animation. Press the spacebar again to stop playback. Then, choose File > Save to save your work so far.
More DetailsJan 30, 2024
Creating a shape with rounded corners – Working with Shape Layers
You’ll use the Rounded Rectangle tool to create the rim of the flowerpot.
- Go to 1:10.
- Select the Rounded Rectangle tool (
), hidden behind the Star tool (
) in the Tools panel.
- In the Composition panel, drag a shape a little wider than the top of the flowerpot. Draw the shape a little bit above the base of the pot.
- Select Shape Layer 1, press Enter or Return, and change the layer’s name to Rim of Flowerpot. Press Enter or Return to accept the new name.
- Select the Rim of Flowerpot layer.
- If the rim matches the base, skip to step 7. Otherwise, click the eyedropper next to the Fill Color property in the Properties panel, and then click the base of the flowerpot in the Composition panel to sample the color.
- Click the stopwatch icon (
) next to the Fill Color property to create an initial keyframe.
- Go to 4:01, and use the eyedropper to change the fill color to match the lighter brown in the flowerpot base.
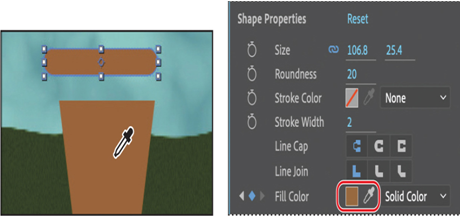
9. Hide all layer properties. Press F2 or click an empty area in the Timeline panel to deselect all layers.
Snapping layers into position
The flowerpot layers currently have no relationship to each other in the composition. You’ll use the Snapping option in After Effects to quickly align the layers. When the Snapping option is enabled, the layer feature that is closest to your pointer when you click becomes the snapping feature. As you drag the layer near other layers, features on other layers are highlighted, showing you where the snapping feature would snap if you released the mouse button.
Note
You can snap two shape layers together, but not two shapes within a single layer. Also, a layer must be visible to snap to it. 2D layers can snap to 2D layers, and 3D layers can snap to 3D layers.
- Select the Selection tool (
) in the Tools panel.
- Select Snapping in the options section of the Tools panel, if it’s not already selected.
Tip
If the Snapping option isn’t selected, you can temporarily enable it: Click a layer and start dragging, and then press Ctrl (Windows) or Command (macOS) as you drag the layer.

3. Select the Rim of Flowerpot layer in the Timeline panel.
When you select a layer in the Composition panel, After Effects displays the layer handles and anchor point. You can use any of these points as the snapping feature for a layer.
4. Click near the bottom of the rim, and drag it near the upper edge of the Base of Flowerpot layer until it snaps into place. Be careful not to drag the corner itself, or you’ll resize the layer.
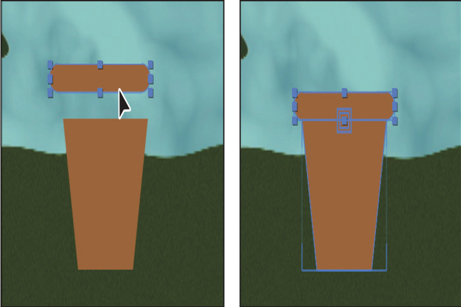
As you drag the layer, a box appears around the handle you selected, indicating that it is the snapping feature.
5. Use the Selection tool to adjust the size of the rim or base of the flowerpot if you need to.
6. Deselect all layers, and choose File > Save to save your work.
More DetailsNov 18, 2023
Duplicating a shape – Working with Shape Layers
The sky should have more than one star, and they should all shimmer. You’ll duplicate the star you created multiple times so that each of the new layers has the same properties as the original. Then you’ll adjust each star’s position and rotation separately. Finally, you’ll animate the offset paths to accentuate the twinkling effect.
- Press the Home key or move the current-time indicator to the beginning of the time ruler.
- Select the Star 1 layer in the Timeline panel.
- Choose Edit > Duplicate.
After Effects adds a Star 2 layer at the top of the layer stack. It is identical to the Star 1 layer, including its position.
4. Press Ctrl+D (Windows) or Command+D (macOS) five times to create five additional star layers.
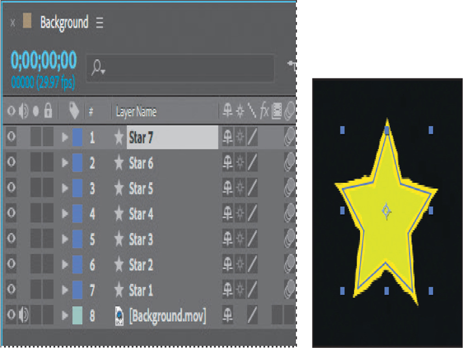
5. Select the Selection tool () in the Tools panel, and press F2 to deselect all layers in the Timeline panel.
Adjusting the position, scale, and rotation of each shape
The stars you created are all on top of each other. You’ll customize the position, scale, and angle of rotation for each.
- Using the Selection tool, drag each star to a different position in the sky.
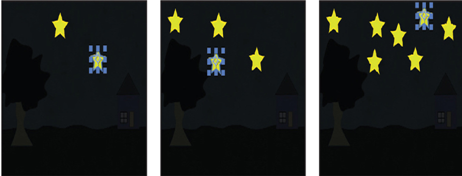
2. Select the Star 1 layer, and then adjust its Rotation and Scale values in the Properties panel.
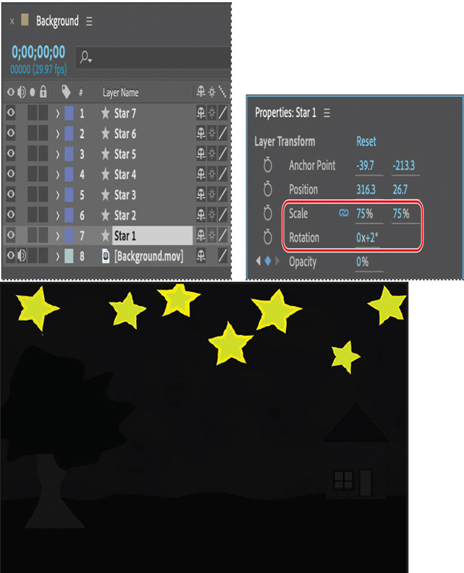
3. Adjust the Rotation and Scale values for each of the other layers to create variation among the stars. You can also use the Selection tool to adjust the stars’ positions.
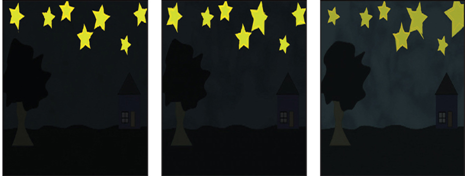
4. Press the spacebar to preview the animation. The stars twinkle and fade as night turns to day. Press the spacebar again to stop the playback.
Animating concentric shapes
You’ll enhance the twinkling effect by animating the stroke for each star.
- Press the Home key or move the current-time indicator to the beginning of the time ruler.
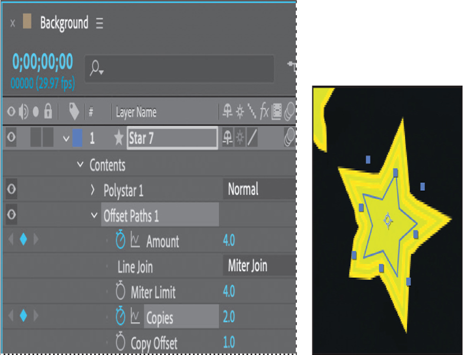
- Expand the properties for the Star 7 layer, and then choose Offset Paths from the Add menu.
The selected star expands in the Composition panel; its stroke has been repeated multiple times.
3. Expand the Offset Paths 1 properties in the Timeline panel.
4. Reduce the Amount to 4, and increase Copies to 2.
The Amount value determines how much the shape expands; positive values expand the stroke outward, and negative values send it inward. Increase the number of Copies to add repetition.
5. Click the stopwatch icon () next to the Amount and Copies properties to create initial keyframes.
6. Go to 0:10, and change the Copies to 3. Then, go to 1:00, and change the Amount to 1 and the Copies to 1.
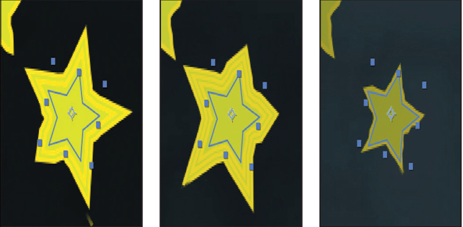
7. Repeat steps 2–6 for each of the other stars, varying the timing and settings so that they expand and contract at different times.
8. Hide the properties for all layers. Then select the Star 1 layer and Shift-select the Star 7 layer to select all the star layers.
9. Choose Layer > Pre-compose, name the new composition Starscape, and click OK.
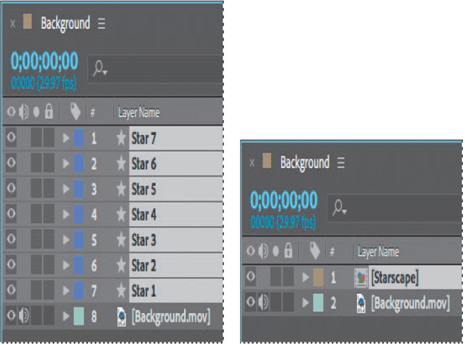
After Effects creates a new composition named Starscape that contains the seven star shapes; the new composition replaces the layers in the Background composition. You can continue to edit the star layers by opening the Starscape composition, but precomposing the layers keeps the Timeline panel organized.
10. Choose File > Save to save your work so far.
Oct 25, 2023
Applying a fill and stroke – Working with Shape Layers
You can change the color of a shape by modifying its Fill settings in the Tools panel. Clicking the word Fill opens the Fill Options dialog box, where you can select the kind of fill, its blending mode, and its opacity. Clicking the Fill Color box opens the Adobe Color Picker if the fill is solid or the Gradient Editor if the fill is a gradient.
Similarly, you can change the color and width of the stroke of a shape by modifying its Stroke settings in the Tools panel. Click the word Stroke to open the Stroke Options dialog box; click the Stroke Color box to select a color.
- Select the Star 1 layer in the Timeline panel.
- Click the Fill Color box to open the Shape Fill Color dialog box.
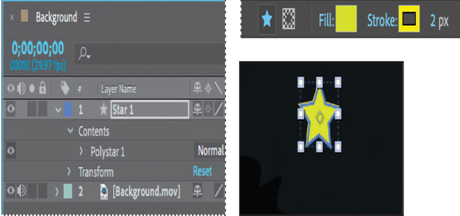
- Change the color to a bright yellow (we used R=215, G=234, B=23), and click OK.
- Click the Stroke Color box, change the stroke color to an even brighter yellow color (we used R=252, G=245, B=3), and then click OK.
- Make sure the Stroke Width value is 2 px.
6. Choose File > Save to save your work so far.
Creating a self-animating shape
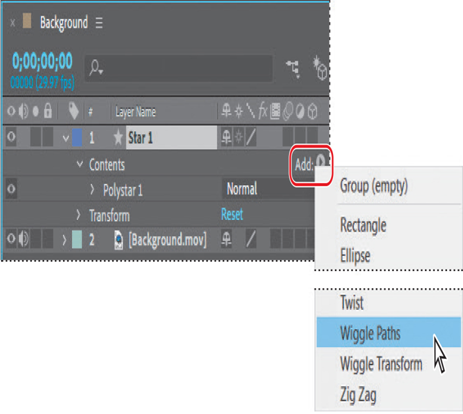
Wiggle Paths is a path operation that turns a smooth shape into a series of jagged peaks and valleys. You’ll use it to make the star shimmer a little. Because the operation is self-animating, you need to change only a few properties for the entire shape to move on its own.
- Expand the Star 1 layer in the Timeline panel, if it isn’t already expanded, and choose Wiggle Paths from the Add pop-up menu.
2. Press the spacebar to play the movie so you can see the effect. Press the spacebar again to stop playback.
The star’s edge is too jagged. You’ll change the settings for a subtler effect.
3. Expand Wiggle Paths 1. Then change the Size to 2.0 and the Detail to 3.0.
4. Change Wiggles/Second to 5.0.
5. Click the Motion Blur switch () for the layer.
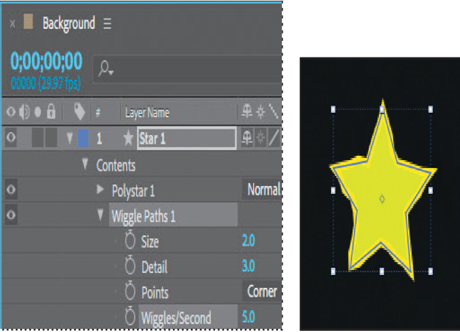
When you enable Motion Blur for a layer, After Effects enables it for the entire composition, so that you can apply Motion Blur to any additional layers.
6. Hide the layer properties.
7. Press the spacebar to preview the star’s effect; press it again to stop playback.
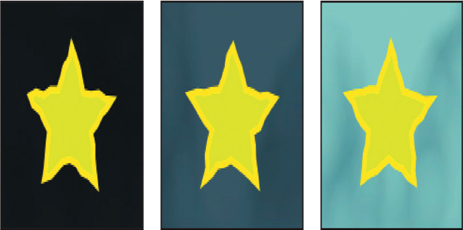
The star shouldn’t be visible during the daytime, so you’ll animate its Opacity value.
8. Press the Home key or move the current-time indicator to the beginning of the time ruler.
9. Select the Star 1 layer in the Timeline panel.
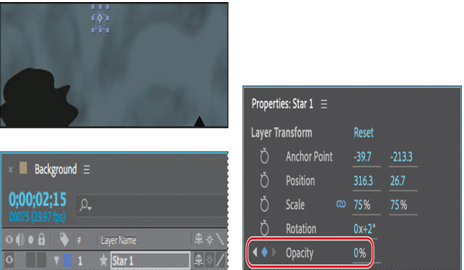
10. In the Layer Transform section of the Properties panel, click the stopwatch icon () for Opacity to create an initial keyframe at 100%.
11. Go to 2:15, and change the Opacity value to 0%.
Sep 16, 2023
Creating the composition – Working with Shape Layers
Next, you’ll import the background movie and create the composition.
- Click New Composition From Footage in the Composition panel.
- Navigate to the Lessons/Lesson04/Assets folder on your hard disk, select the Background.mov file, and then click Import or Open.
After Effects adds the Background.mov file to the Project panel. It creates a composition based on the Background.mov file and opens the new composition in both the Timeline and Composition panels.
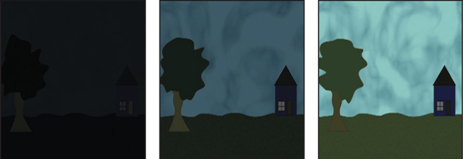
3. Press the spacebar to preview the background movie. In the scene, night turns to day as the sky lightens and the colors brighten. Press the spacebar again to stop playback.
Adding a shape layer
After Effects includes five shape tools: Rectangle, Rounded Rectangle, Ellipse, Polygon, and Star. When you draw a shape directly in the Composition panel, After Effects adds a new shape layer to the composition. You can apply stroke and fill settings to a shape, modify its path, and apply animation presets. Shape attributes are represented in the Timeline panel; many are also in the Properties panel. You can animate each setting over time.
The same drawing tools can create both shapes and masks. Masks are applied to layers to hide or reveal areas or as input into effects; shapes have their own layers. When you select a drawing tool, you can specify whether the tool draws a shape or a mask.
Drawing a shape
You’ll begin by drawing a star.
- Press the Home key or move the current-time indicator to the beginning of the time ruler.
- Press F2 or click an empty area in the Timeline panel to make sure no layers are selected.
If you draw a shape when a layer is selected, the shape becomes a mask for that layer; the cursor displays a masked box () as you start to draw. If you draw a shape when no layer is selected, After Effects creates a shape layer; the cursor displays a star (
) as you start to draw.
3. Choose Edit > Settings > General (Windows) or After Effects > Settings > General (macOS). Select Center Anchor Point In New Shape Layers, and click OK.
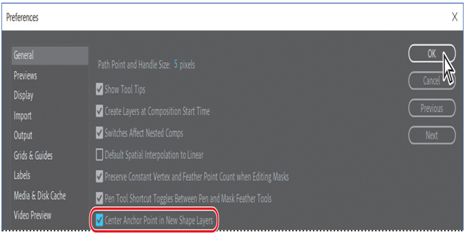
The anchor point is the reference point After Effects uses when it changes a layer’s position, scale, or rotation. By default, a shape layer’s anchor point is at the center of the composition. Selecting Center Anchor Point In New Shape Layers positions the anchor point in the center of the first shape you draw on a layer.
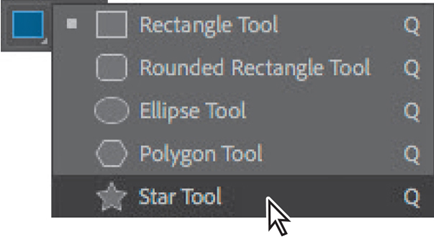
4. Select the Star tool (), hidden behind the Rectangle tool (
) in the Tools panel.
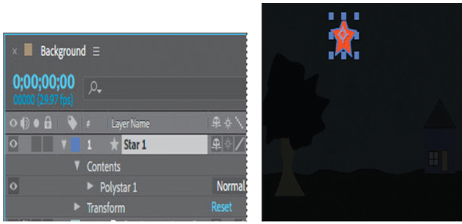
5. Drag a small star in the sky.
The shape appears in the Composition panel, and After Effects adds a shape layer named Shape Layer 1 to the Timeline panel.
6. Select the Shape Layer 1 layer name, press Enter or Return, change the layer name to Star 1, and press Enter or Return to accept the change.
Aug 3, 2023
Getting started – Working with Shape Layers
Lesson overview
In this lesson, you’ll learn how to do the following:
- Create custom shapes.
- Customize a shape’s fill and stroke.
- Use path operations to transform shapes.
- Animate shapes.
- Taper strokes in shapes.
- Snap layers into alignment.
- Use the Create Nulls From Paths panel.
This lesson will take about an hour to complete. If you haven’t already done so, download the project files for this lesson from peachpit.com/AfterEffectsCIB2024, following the instructions in the Getting Started section under “Accessing the lesson files and Web Edition.”
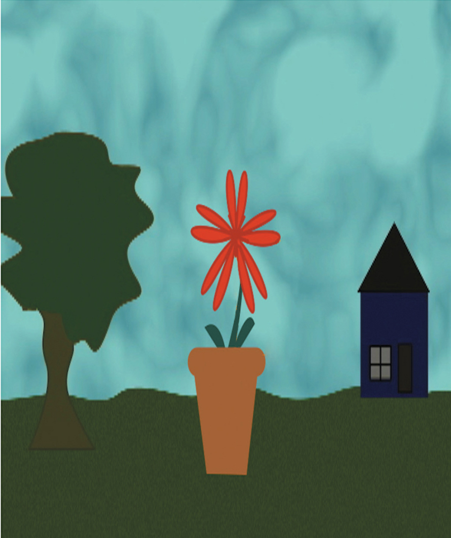
PROJECT: ANIMATED ILLUSTRATION
Shape layers make it easy to create expressive backgrounds and intriguing results. You can animate shapes, apply animation presets, and connect them to other shapes to intensify their impact.
Getting started
Shape layers are created automatically when you draw a shape with any of the drawing tools. You can customize and transform an individual shape or its entire layer to create interesting results. In this lesson, you will use shape layers to create a whimsical animation.
First, you’ll preview the final movie and set up the project.
- Make sure the following files are in the Lessons/Lesson04 folder on your hard disk, or download them from peachpit.com now:
- In the Assets folder: Background.mov
- In the Sample_Movie folder: Lesson04.mp4
- Open and play the Lesson04.mp4 sample movie in Windows Movies & TV or QuickTime Player to see what you will create in this lesson. When you are done, close Windows Movies & TV or QuickTime Player. You may delete the sample movie from your hard disk if you have limited storage space.
As you start After Effects, restore the default application settings. See “Restoring default preferences” on page 3.
3. Start After Effects, and then immediately hold down Ctrl+Alt+Shift (Windows) or Command+Option+Shift (macOS) to restore default preferences settings. In the Startup Repair Options dialog box, click Reset Preferences.
4. Click New Project in the Home window.
After Effects opens to display a blank, untitled project.
5. Choose File > Save As > Save As, and then navigate to the Lessons/Lesson04/Finished_Project folder.
6. Name the project Lesson04_Finished.aep, and then click Save.
More DetailsDec 18, 2022
Applying a tracking preset – Animating Text
First you’ll create the text, and then you’ll add a tracking preset.
- Select the Horizontal Type tool (
), and then type BLUE CRAB CHARTERS.
- Select the BLUE CRAB CHARTERS layer. In the Properties panel, choose Times New Roman Bold from the Font Family menu, choose 48 px from the Font Size menu, set the Fill to white, and deselect Stroke. In the Paragraph section of the panel, make sure Center Text is selected.
- Go to 7:10.
- Use the Selection tool (
) to move the BLUE CRAB CHARTERS layer down to the lower third of the screen, aligned with Snorkel Tours, as in the image below.
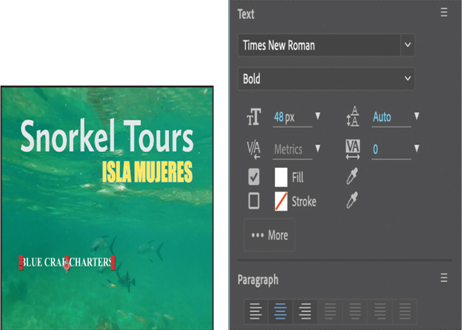
5. Open the Effects & Presets panel. Then type Increase Tracking in the search box, and double-click the preset to apply it to the BLUE CRAB CHARTERS layer.
6. Drag the current-time indicator across the time ruler between 7:10 and 9:10 to manually preview the tracking animation.

Customizing the tracking animation preset
The text expands, but you want the letters to be so close initially that they’re nearly on top of each other, and then to expand to a reasonable, readable distance apart. The animation should also occur more quickly. You’ll adjust the Tracking Amount to achieve both goals.
- Select the BLUE CRAB CHARTERS layer in the Timeline panel, and press UU to reveal the properties that were modified.
- Go to 7:10.
- Under Animator 1, change the Tracking Amount to −5 so that the letters are squeezed together.
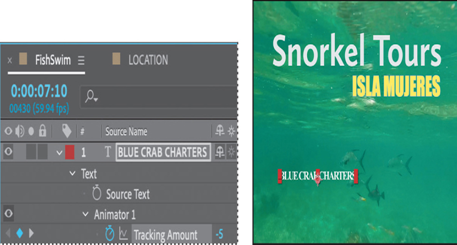
4. Click the Go To Next Keyframe arrow () for the Tracking Amount property, and then change the value to 0.
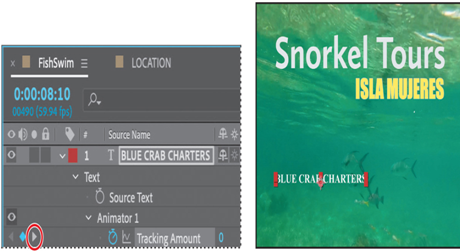
5. Drag the current-time indicator across the time ruler between 7:10 and 8:10. The letters expand, and stop animating at the last keyframe.
6. Hide the properties for all layers.
Animating text opacity
You’ll take the animation of the company name a little further by having it fade onscreen as the letters expand. To do this, you’ll animate the layer’s Opacity property.
- Make sure the BLUE CRAB CHARTERS layer is selected.
- Go to 7:10. In the Properties panel, set the Opacity to 0%. Then click the stopwatch icon (
) to set an Opacity keyframe.
- Go to 7:20, and set the Opacity to 100%. After Effects adds a second keyframe.
Now the letters of the company name will fade in as they expand onscreen.
4. Drag the current-time indicator across the time ruler between 7:10 and 8:10 to see the letters of the company fade in as they spread out.

5. Right-click (Windows) or Control-click (macOS) the ending Opacity keyframe, and choose Keyframe Assistant > Easy Ease In.
6. Choose File > Save.
More DetailsOct 9, 2022
Importing text – Animating Text
Animating imported Photoshop text
When you just need to add a few words of text to a unique project, it works well to type directly into After Effects. But in the real world, you may need to ensure brand and style consistency among multiple projects. Fortunately, you can import text from Photoshop or Illustrator. You can preserve text layers, edit them, and animate them in After Effects.
Importing text
Some of the remaining text for this composition is in a layered Photoshop file, which you’ll import now.
- Double-click an empty area in the Project panel to open the Import File dialog box.
- Select the LOCATION.psd file in the Lessons/Lesson03/Assets folder. Choose Composition – Retain Layer Sizes from the Import As menu. (In macOS, you may need to click Options to see the Import As menu.) Then click Import or Open.
- In the LOCATION.psd dialog box, select Editable Layer Styles, and click OK.
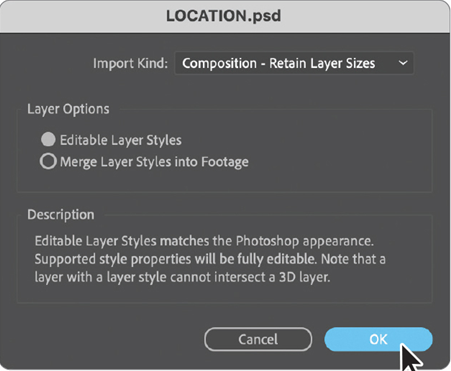
After Effects can import Photoshop layer styles, retaining the appearance of the layers you’re importing. The imported file is added as a composition to the Project panel; its layers are added in a separate folder.
4. Drag the LOCATION composition from the Project panel into the Timeline panel, placing it at the top of the layer stack.
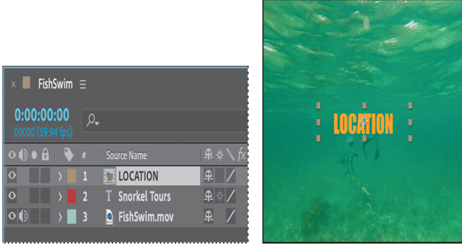
Because you imported the LOCATION.psd file as a composition with layers intact, you can work on it in its own Timeline panel, editing and animating its layers independently.
Editing imported text
The text you imported isn’t currently editable in After Effects. You’ll change that so that you can control the type and apply animations. The LOCATION.psd file is a boilerplate template for the location of company tours. You’ll edit the text and add a stroke to help it stand out for this promotion.
- Double-click the LOCATION composition in the Project panel to open it in its own Timeline panel.
- Select the LOCATION layer in the Timeline panel, and choose Layer > Create > Convert To Editable Text. (Click OK if you see a warning about missing fonts.)

Now the text layer can be edited, so you can customize the tour location.
3. Double-click the LOCATION layer in the Timeline panel to select the text and automatically switch to the Horizontal Type tool ().
4. Type ISLA MUJERES.
Note
The layer name does not change in the Timeline panel when you change the text in the layer. This is because the original layer name was created in Photoshop. To change a layer’s name, select it in the Timeline panel, press Enter or Return, type the new name, and press Enter or Return again.
5. Switch to the Selection tool () to exit text-editing mode.
6. In the Text section of the Properties dialog box, click the Stroke color box to open it. Select a teal blue color (we used R=70, G=92, B=101), and click OK. Leave all other settings as they are.
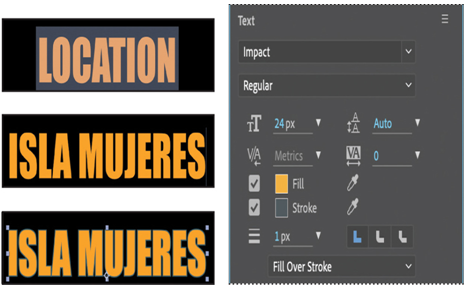
7. Choose File > Save to save your work so far.
More Details