Jul 12, 2024
Previewing the composition – Working with Shape Layers
You’ve created several shape layers using shape tools and the Pen tool, animated them, and used null objects to parent them. It’s time to see how it all comes together.
- Hide all layer properties, and then press F2 to deselect all layers.
- Press the Home key or move the current-time indicator to the beginning of the time ruler.
- Press the spacebar to preview your animation. Press the spacebar again to stop playback.
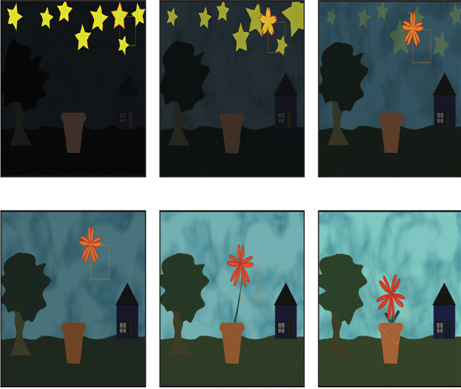
4.Make any adjustments you need to make. For example, if the leaves protrude from the flowerpot as they rise with the stem, use the Selection tool to adjust their position or rotation, or animate the leaves’ opacity so that they are visible only as they emerge from the pot.
Tip
To rotate a leaf from its tip, use the Pan Behind tool to move its anchor point to the tip.
5.Choose File > Save to save the final project.
Animating layers to match audio
You can time animation to match the beat of an audio file. First you need to create keyframes from the amplitude of the audio (which determines loudness), and then sync the animation to those values.
- To create keyframes from audio amplitude, right-click or Control-click the audio layer in the Timeline panel, and choose Keyframe Assistant > Convert Audio To Keyframes. After Effects adds the Audio Amplitude layer. The new layer is a null object layer, meaning it has no size or shape and won’t appear in a final render. After Effects creates keyframes that specify the amplitude of the audio file in each frame of the layer.
- To sync an animated property with the audio amplitude, select the Audio Amplitude layer, and press E to display the effects properties for the layer. Expand the channel you want to use. Then Alt-click (Windows) or Option-click (macOS) the stopwatch icon for the property whose animation you want to sync with to add an expression; with the expression selected in the time ruler, click the pick whip icon (
) on the Expression:[property name] line, and drag it to the Slider property name in the Audio Amplitude layer. When you release the mouse, the pick whip snaps, and the expression in the shape layer time ruler now means that the property values for the layer will depend on the Slider values of the Audio Amplitude layer.
Review questions
1 What is a shape layer, and how do you create one?
2 How can you create multiple copies of a layer, including all of its properties?
3 How can you snap one layer to another?
4 What does the Pucker & Bloat path operation do?
Review answers
1 A shape layer is simply a layer that contains a vector graphic called a shape. To create a shape layer, draw a shape directly in the Composition panel, using any of the drawing tools or the Pen tool.
2 To duplicate a layer, select it, and choose Edit > Duplicate or press Ctrl+D (Windows) or Command+D (macOS). All of the original layer’s properties, keyframes, and other attributes are included in the new layer.
3 To snap one layer to another in the Composition panel, select Snapping in the options section of the Tools panel. Then click next to the handle or point you want to use as a snapping feature, and drag the layer close to the point to which you want to align it. After Effects highlights the points to which it will align when you release the mouse button.
4 Pucker & Bloat pulls the vertices of a path outward while curving the segments inward (puckering), or pulls the vertices inward while curving the segments outward (bloating). You can animate the degree of pucker or bloat over time.
More Details