Sep 16, 2023
Creating the composition – Working with Shape Layers
Next, you’ll import the background movie and create the composition.
- Click New Composition From Footage in the Composition panel.
- Navigate to the Lessons/Lesson04/Assets folder on your hard disk, select the Background.mov file, and then click Import or Open.
After Effects adds the Background.mov file to the Project panel. It creates a composition based on the Background.mov file and opens the new composition in both the Timeline and Composition panels.
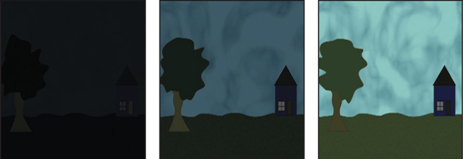
3. Press the spacebar to preview the background movie. In the scene, night turns to day as the sky lightens and the colors brighten. Press the spacebar again to stop playback.
Adding a shape layer
After Effects includes five shape tools: Rectangle, Rounded Rectangle, Ellipse, Polygon, and Star. When you draw a shape directly in the Composition panel, After Effects adds a new shape layer to the composition. You can apply stroke and fill settings to a shape, modify its path, and apply animation presets. Shape attributes are represented in the Timeline panel; many are also in the Properties panel. You can animate each setting over time.
The same drawing tools can create both shapes and masks. Masks are applied to layers to hide or reveal areas or as input into effects; shapes have their own layers. When you select a drawing tool, you can specify whether the tool draws a shape or a mask.
Drawing a shape
You’ll begin by drawing a star.
- Press the Home key or move the current-time indicator to the beginning of the time ruler.
- Press F2 or click an empty area in the Timeline panel to make sure no layers are selected.
If you draw a shape when a layer is selected, the shape becomes a mask for that layer; the cursor displays a masked box () as you start to draw. If you draw a shape when no layer is selected, After Effects creates a shape layer; the cursor displays a star (
) as you start to draw.
3. Choose Edit > Settings > General (Windows) or After Effects > Settings > General (macOS). Select Center Anchor Point In New Shape Layers, and click OK.
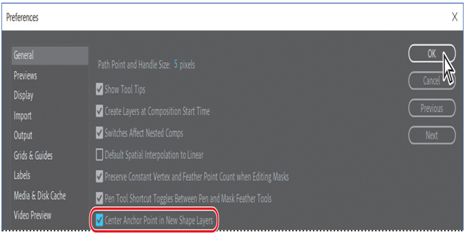
The anchor point is the reference point After Effects uses when it changes a layer’s position, scale, or rotation. By default, a shape layer’s anchor point is at the center of the composition. Selecting Center Anchor Point In New Shape Layers positions the anchor point in the center of the first shape you draw on a layer.
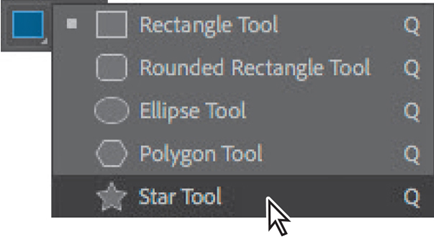
4. Select the Star tool (), hidden behind the Rectangle tool (
) in the Tools panel.
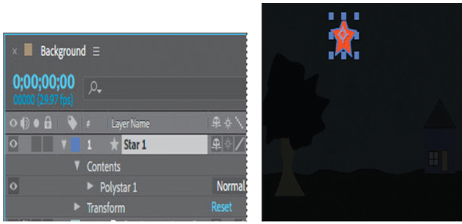
5. Drag a small star in the sky.
The shape appears in the Composition panel, and After Effects adds a shape layer named Shape Layer 1 to the Timeline panel.
6. Select the Shape Layer 1 layer name, press Enter or Return, change the layer name to Star 1, and press Enter or Return to accept the change.