Jun 1, 2022
Adding Easy Ease – Animating Text
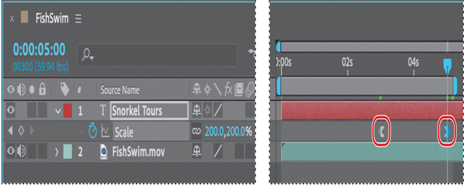
The beginning and end of the scale animation are rather abrupt. In nature, nothing comes to an absolute stop. Instead, objects ease into and out of starting and stopping points. You’ll apply Easy Ease to make the animation smoother.
- In the Timeline panel, right-click (Windows) or Control-click (macOS) the Scale keyframe at 3:00, and choose Keyframe Assistant > Easy Ease Out. The keyframe becomes a left-pointing icon.
- Right-click (Windows) or Control-click (macOS) the Scale keyframe at 5:00, and choose Keyframe Assistant > Easy Ease In. The keyframe becomes a right-pointing icon.
3. Watch another preview. Press the spacebar to stop it when you’re done.
4. Hide the Scale property in the Timeline panel, and then choose File > Save.
Using a text animation preset
Currently, the title appears when the video begins. You’ll animate the title to make its arrival more interesting. The easiest way to do that is to use one of the many animation presets that come with After Effects. After applying an animation preset, you can customize it and save it to use again in other projects.
- Press the Home key or go to 0:00 to make sure the current-time indicator is at the beginning of the time ruler.
After Effects applies animation presets from the current time.
2. Select the Snorkel Tours text layer.
Browsing animation presets
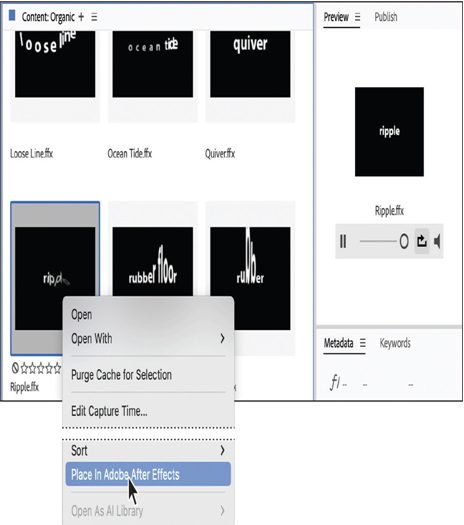
You already applied an animation preset using the Effects & Presets panel in Lesson 2, “Creating a Basic Animation Using Effects and Presets.” But what if you’re not sure which animation preset you want to use? To help you choose the right animation preset for your projects, you can preview presets in Adobe Bridge.
Note
If Bridge isn’t installed, you’ll be prompted to install it when you choose Browse Presets. For more information, see page 2.
- Choose Animation > Browse Presets. Adobe Bridge opens, displaying the contents of the After Effects Presets folder. Click Yes if prompted to enable the After Effects extension in Bridge.
- In the Content panel, double-click the Text folder, and then the Organic folder.
- Click to select the first preset, Autumn. Adobe Bridge plays a sample of the animation in the Preview panel.
- Select a few other presets, and watch them in the Preview panel.
- Preview the Ripple preset, and then right-click (Windows) or Control-click (macOS) the thumbnail, and choose Place In Adobe After Effects.
Note
If a generic ffx image appears instead of the preview, reset Bridge preferences: Press Ctrl+Alt+Shift (Windows) or Command+Option+Shift (macOS) while you restart Bridge.
6. Return to After Effects, but leave Adobe Bridge open in the background.
After Effects applies the preset to the selected layer, which is the Snorkel Tours layer, but the layer no longer appears in the composition. This is because at 0:00, the first frame of the animation, the letters haven’t yet rippled into the scene.
More Details