Dec 18, 2022
Applying a tracking preset – Animating Text
First you’ll create the text, and then you’ll add a tracking preset.
- Select the Horizontal Type tool (
), and then type BLUE CRAB CHARTERS.
- Select the BLUE CRAB CHARTERS layer. In the Properties panel, choose Times New Roman Bold from the Font Family menu, choose 48 px from the Font Size menu, set the Fill to white, and deselect Stroke. In the Paragraph section of the panel, make sure Center Text is selected.
- Go to 7:10.
- Use the Selection tool (
) to move the BLUE CRAB CHARTERS layer down to the lower third of the screen, aligned with Snorkel Tours, as in the image below.
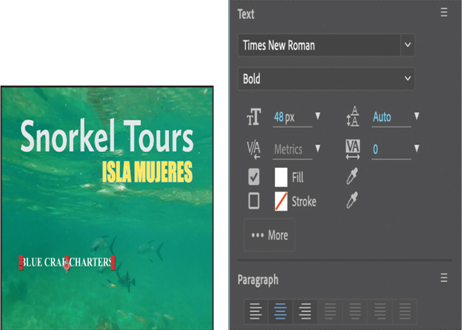
5. Open the Effects & Presets panel. Then type Increase Tracking in the search box, and double-click the preset to apply it to the BLUE CRAB CHARTERS layer.
6. Drag the current-time indicator across the time ruler between 7:10 and 9:10 to manually preview the tracking animation.

Customizing the tracking animation preset
The text expands, but you want the letters to be so close initially that they’re nearly on top of each other, and then to expand to a reasonable, readable distance apart. The animation should also occur more quickly. You’ll adjust the Tracking Amount to achieve both goals.
- Select the BLUE CRAB CHARTERS layer in the Timeline panel, and press UU to reveal the properties that were modified.
- Go to 7:10.
- Under Animator 1, change the Tracking Amount to −5 so that the letters are squeezed together.
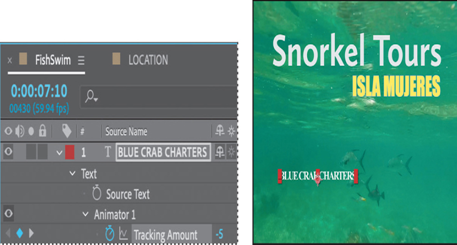
4. Click the Go To Next Keyframe arrow () for the Tracking Amount property, and then change the value to 0.
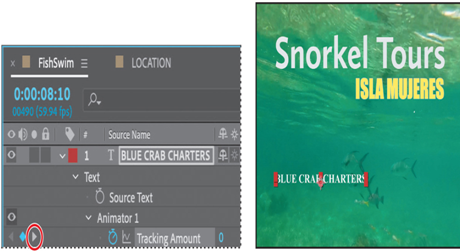
5. Drag the current-time indicator across the time ruler between 7:10 and 8:10. The letters expand, and stop animating at the last keyframe.
6. Hide the properties for all layers.
Animating text opacity
You’ll take the animation of the company name a little further by having it fade onscreen as the letters expand. To do this, you’ll animate the layer’s Opacity property.
- Make sure the BLUE CRAB CHARTERS layer is selected.
- Go to 7:10. In the Properties panel, set the Opacity to 0%. Then click the stopwatch icon (
) to set an Opacity keyframe.
- Go to 7:20, and set the Opacity to 100%. After Effects adds a second keyframe.
Now the letters of the company name will fade in as they expand onscreen.
4. Drag the current-time indicator across the time ruler between 7:10 and 8:10 to see the letters of the company fade in as they spread out.

5. Right-click (Windows) or Control-click (macOS) the ending Opacity keyframe, and choose Keyframe Assistant > Easy Ease In.
6. Choose File > Save.
More DetailsNov 22, 2022
Animating text to appear over time– Animating Text
You want the letters of the location—ISLA MUJERES—to flow organically onto the screen under the activity title. The easiest way to do this is to use another text animation preset.
- Go to 5:00 in the timeline. At that point, the title has finished scaling to its final size.
- Select the LOCATION layer in the Timeline panel.
- Press Ctrl+Alt+Shift+O (Windows) or Command+Option+Shift+O (macOS) to jump to Adobe Bridge.
- Navigate to the Presets/Text/Animate In folder.
- Select the Raining Characters In animation preset, and watch it in the Preview panel. This effect works well to reveal the text gradually.
- Right-click or Control-click the Raining Characters In preset, and choose Place In Adobe After Effects 2024 to apply it to the LOCATION layer, and then return to After Effects.
- With the LOCATION layer selected in the Timeline panel, press UU to see the properties modified by the animation preset. You should see two keyframes for Range Selector 1 Offset: one at 5:00 and one at 7:15.
Note
The Raining Characters In preset changes the color of the text, which is fine for this project.
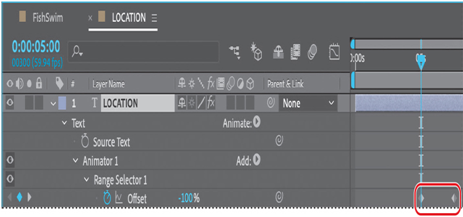
The U key, sometimes referred to as the Überkey, is a valuable keyboard shortcut that reveals all the animated properties of a layer. Press it once to see the animated properties; press it twice to view all modified properties.
You have a lot of animation to fit into this composition, so you’ll speed up the effect.
8. Go to 6:00, and then drag the second Range Selector 1 Offset keyframe to 6:00.
Tip
Press the Shift key while you move the keyframe to ensure it moves to the current time.
9. Select the LOCATION layer, and press U to hide the modified properties.
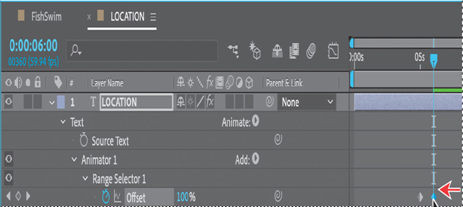
10. Select the FishSwim tab in the Timeline panel to make that timeline active, and then go to 6:00, if you’re not there already.
11. Use the Selection tool () to move the LOCATION layer so that ISLA MUJERES is right-aligned with and just below Snorkel Tours.
12. Deselect all layers. Drag the current-time indicator across the time ruler from 4:00 to 6:00 to see the letters fall into place. Then save your work so far.

Animating type tracking
Next, you’ll add the company name and then animate its appearance using a text animation tracking preset. By animating tracking, you can make words seem to expand outward as they appear onscreen from a central point.
More DetailsOct 9, 2022
Importing text – Animating Text
Animating imported Photoshop text
When you just need to add a few words of text to a unique project, it works well to type directly into After Effects. But in the real world, you may need to ensure brand and style consistency among multiple projects. Fortunately, you can import text from Photoshop or Illustrator. You can preserve text layers, edit them, and animate them in After Effects.
Importing text
Some of the remaining text for this composition is in a layered Photoshop file, which you’ll import now.
- Double-click an empty area in the Project panel to open the Import File dialog box.
- Select the LOCATION.psd file in the Lessons/Lesson03/Assets folder. Choose Composition – Retain Layer Sizes from the Import As menu. (In macOS, you may need to click Options to see the Import As menu.) Then click Import or Open.
- In the LOCATION.psd dialog box, select Editable Layer Styles, and click OK.
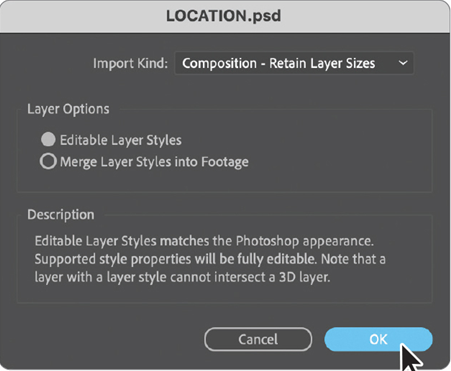
After Effects can import Photoshop layer styles, retaining the appearance of the layers you’re importing. The imported file is added as a composition to the Project panel; its layers are added in a separate folder.
4. Drag the LOCATION composition from the Project panel into the Timeline panel, placing it at the top of the layer stack.
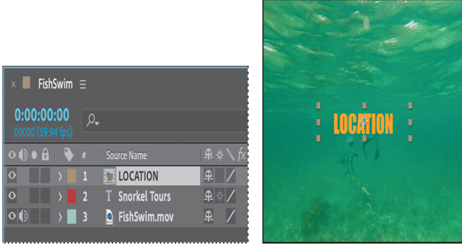
Because you imported the LOCATION.psd file as a composition with layers intact, you can work on it in its own Timeline panel, editing and animating its layers independently.
Editing imported text
The text you imported isn’t currently editable in After Effects. You’ll change that so that you can control the type and apply animations. The LOCATION.psd file is a boilerplate template for the location of company tours. You’ll edit the text and add a stroke to help it stand out for this promotion.
- Double-click the LOCATION composition in the Project panel to open it in its own Timeline panel.
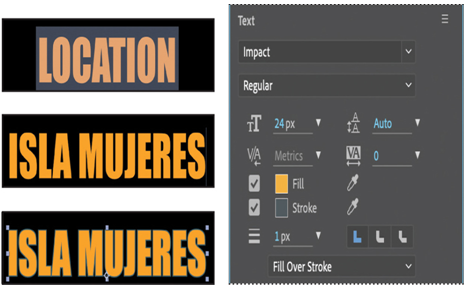
- Select the LOCATION layer in the Timeline panel, and choose Layer > Create > Convert To Editable Text. (Click OK if you see a warning about missing fonts.)

Now the text layer can be edited, so you can customize the tour location.
3. Double-click the LOCATION layer in the Timeline panel to select the text and automatically switch to the Horizontal Type tool ().
4. Type ISLA MUJERES.
Note
The layer name does not change in the Timeline panel when you change the text in the layer. This is because the original layer name was created in Photoshop. To change a layer’s name, select it in the Timeline panel, press Enter or Return, type the new name, and press Enter or Return again.
5. Switch to the Selection tool () to exit text-editing mode.
6. In the Text section of the Properties dialog box, click the Stroke color box to open it. Select a teal blue color (we used R=70, G=92, B=101), and click OK. Leave all other settings as they are.
7. Choose File > Save to save your work so far.
More DetailsAug 18, 2022
About Adobe Bridge – Animating Text
Adobe Bridge is a powerful, flexible tool for organizing, browsing, and locating the assets you need to create content for print, web, television, DVD, film, and mobile devices. Adobe Bridge keeps native Adobe files (such as PSD and PDF files) as well as non-Adobe files available for easy access. You can drag assets into your layouts, projects, and compositions as needed; preview your assets; and even add metadata (file information) to assets to make files easier to locate.
In this lesson, you’re opening Adobe Bridge from within After Effects, but you can also open Adobe Bridge directly. To do so, choose Adobe Bridge from the Start menu (Windows) or double-click the Adobe Bridge icon in the Applications/ Adobe Bridge folder (macOS).
The Content panel in Adobe Bridge updates interactively. For example, when you select the Assets folder in the Folders panel, thumbnail previews of the folder’s contents appear in the Content panel. Adobe Bridge displays previews of image files such as those in PSD, TIFF, and JPEG formats, as well as Illustrator vector files, multipage Adobe PDF files, QuickTime movie files, and more.
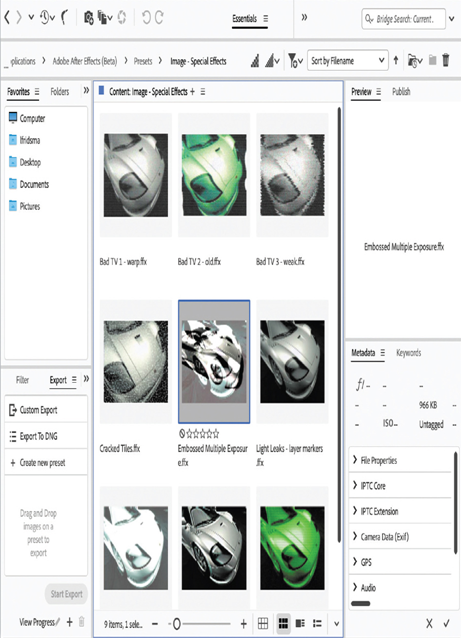
You may need to install Adobe Bridge separately from Creative Cloud. If Bridge is not installed, you’ll be prompted to install it when you choose Animation > Browse Presets.
Customizing an animation preset
After you apply an animation preset to a layer, all of its properties and keyframes are listed in the Timeline panel. You’ll use those properties to customize the preset.
- Press the spacebar to watch a preview of the animation. The letters flip into place, and then the entire title scales down to 200%. Press the spacebar again to stop the preview.

The letters appear to ripple into the background. It looks great—but you’ll customize the preset to change the order in which the letters appear.
2. Select the Snorkel Tours text layer in the Timeline panel, and then expand the layer’s properties. Navigate to the Text > Animator – Ripple 1 (Skew) > Selector Offset > Advanced properties.
3. Click Off next to Randomize Order to toggle it to On.
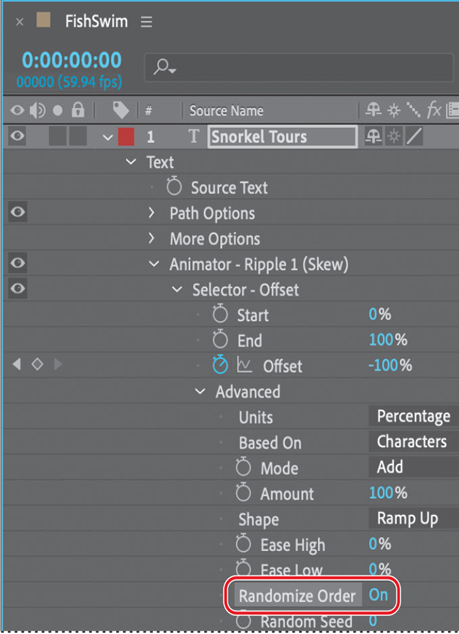
The Randomize Order property changes the order in which letters appear on the screen as they ripple into place.
4. Drag the current-time indicator from 0:00 to 3:00 to manually preview the animation you edited.

5. Hide the layer’s properties.
6. Press the End key to move the current-time indicator to the end of the time ruler, and then press N to set the end bracket of the work area.
7. Press the Home key or go to 0:00 to return the current-time indicator to the beginning of the time ruler.
8. Choose File > Save to save your project.
More DetailsJun 1, 2022
Adding Easy Ease – Animating Text
The beginning and end of the scale animation are rather abrupt. In nature, nothing comes to an absolute stop. Instead, objects ease into and out of starting and stopping points. You’ll apply Easy Ease to make the animation smoother.
- In the Timeline panel, right-click (Windows) or Control-click (macOS) the Scale keyframe at 3:00, and choose Keyframe Assistant > Easy Ease Out. The keyframe becomes a left-pointing icon.
- Right-click (Windows) or Control-click (macOS) the Scale keyframe at 5:00, and choose Keyframe Assistant > Easy Ease In. The keyframe becomes a right-pointing icon.
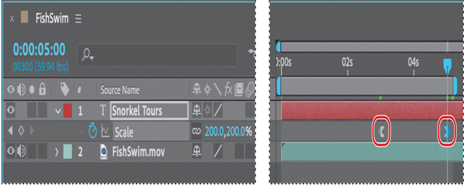
3. Watch another preview. Press the spacebar to stop it when you’re done.
4. Hide the Scale property in the Timeline panel, and then choose File > Save.
Using a text animation preset
Currently, the title appears when the video begins. You’ll animate the title to make its arrival more interesting. The easiest way to do that is to use one of the many animation presets that come with After Effects. After applying an animation preset, you can customize it and save it to use again in other projects.
- Press the Home key or go to 0:00 to make sure the current-time indicator is at the beginning of the time ruler.
After Effects applies animation presets from the current time.
2. Select the Snorkel Tours text layer.
Browsing animation presets
You already applied an animation preset using the Effects & Presets panel in Lesson 2, “Creating a Basic Animation Using Effects and Presets.” But what if you’re not sure which animation preset you want to use? To help you choose the right animation preset for your projects, you can preview presets in Adobe Bridge.
Note
If Bridge isn’t installed, you’ll be prompted to install it when you choose Browse Presets. For more information, see page 2.
- Choose Animation > Browse Presets. Adobe Bridge opens, displaying the contents of the After Effects Presets folder. Click Yes if prompted to enable the After Effects extension in Bridge.
- In the Content panel, double-click the Text folder, and then the Organic folder.
- Click to select the first preset, Autumn. Adobe Bridge plays a sample of the animation in the Preview panel.
- Select a few other presets, and watch them in the Preview panel.
- Preview the Ripple preset, and then right-click (Windows) or Control-click (macOS) the thumbnail, and choose Place In Adobe After Effects.
Note
If a generic ffx image appears instead of the preview, reset Bridge preferences: Press Ctrl+Alt+Shift (Windows) or Command+Option+Shift (macOS) while you restart Bridge.
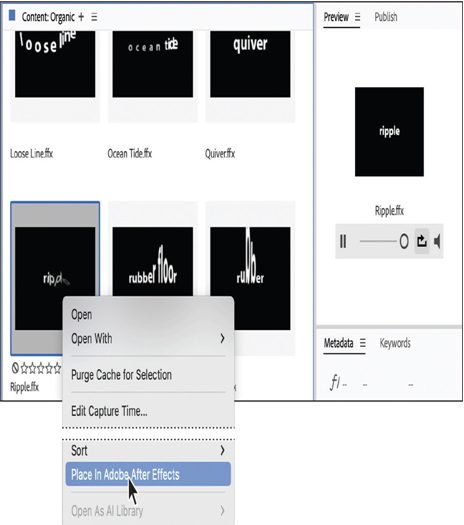
6. Return to After Effects, but leave Adobe Bridge open in the background.
After Effects applies the preset to the selected layer, which is the Snorkel Tours layer, but the layer no longer appears in the composition. This is because at 0:00, the first frame of the animation, the letters haven’t yet rippled into the scene.
More DetailsMay 2, 2022
Positioning the type – Animating Text
To precisely position layers, such as the text layer you’re working on now, you can display rulers, guides, and grids in the Composition panel. These visual reference tools don’t appear in the final rendered movie.
- Make sure the Snorkel Tours text layer is selected in the Timeline panel.
- Choose Layer > Transform > Fit To Comp Width. This scales the layer to fit to the width of the composition.
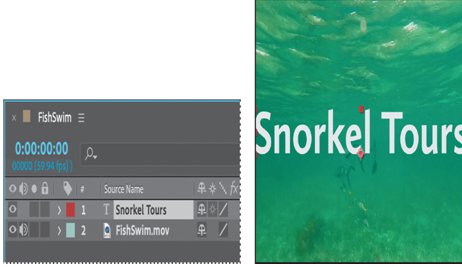
Now you can position the text layer using a grid.
3. Choose View > Show Grid and then View > Snap To Grid.
4. Using the Selection tool (), drag the text up in the Composition panel until the text is in the top quarter of the composition, centered in the surface of the water. Press Shift after you start dragging to constrain the movement and help you position the text.
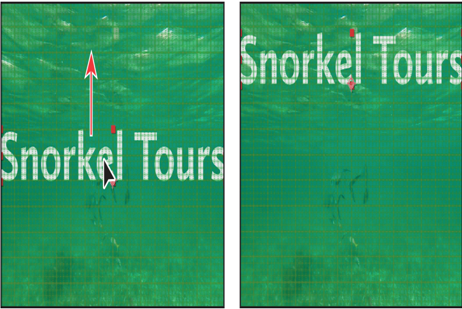
5. When the layer is in position, choose View > Show Grid again to hide the grid.
This project isn’t destined for broadcast TV, so it’s okay that the title extends beyond the title-safe and action-safe areas of the composition at the beginning of the animation.
6. Choose File > Save to save your project.
Animating with scale keyframes
The text layer was scaled to nearly 250% when you applied the Fit To Comp Width command to it earlier in this lesson. Now, you’ll animate the layer’s scale so that the type gradually shrinks down to 200%.
- In the Timeline panel, move the current-time indicator to 3:00.
- Select the Snorkel Tours text layer.
- In the Properties panel, click the stopwatch icon (
) next to the Scale property to add a keyframe at the current time (3:00).
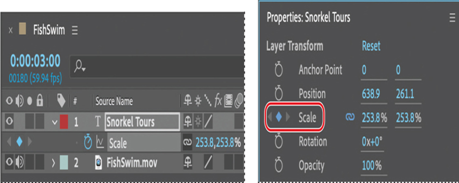
4. Move the current-time indicator to 5:00.
5. Reduce the layer’s Scale values to 200, 200%. After Effects adds a new Scale keyframe at the current time.
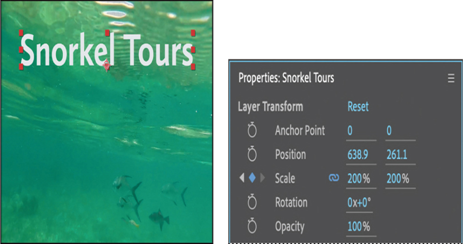
Previewing a range of frames
Now, you’ll preview the animation. Although the composition is 13 seconds long, you need to preview only the first five seconds, since that is where the text animation occurs.
- Move the current-time indicator to 5:10, and press N to set the end of the work area. The scale animation ends shortly before 5:10.
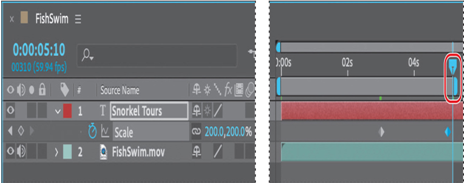
2. Press the spacebar to preview the animation from 0:00 to 5:10. The movie title scales to a smaller size.

3. Press the spacebar to stop playback after you’ve viewed the animation.
More DetailsMar 24, 2022
Creating and formatting point text – Animating Text
When you enter point text in After Effects, each line of text is independent—the length of a line increases or decreases as you edit the text, but it doesn’t wrap to the next line. The text you enter appears in a new text layer. The small line through the I-beam marks the position of the text baseline.
- In the Tools panel, select the Horizontal Type tool (
).

Note
If you press Enter or Return on the regular keyboard instead of on the numeric keypad, you’ll begin a new paragraph.
2. Click anywhere in the Composition panel, and type Snorkel Tours. Then exit text-editing mode by pressing Enter on the numeric keypad or selecting the layer name in the Timeline panel. The text layer is selected in the Composition panel.
Formatting character attributes
You can edit character attributes in the Character panel or the Properties panel. If text is highlighted, changes you make affect only the highlighted text. If no text is highlighted, changes you make affect the selected text layers and the text layers’ selected Source Text keyframes, if any exist. To create defaults for the next text entry, make changes in the Character panel when no text is highlighted and no text layers are selected. By default, the Properties panel displays character options when you select a text layer.
Tip
To open the Character panel, choose Window > Character. To open the Paragraph panel, choose Window > Paragraph.
After Effects displays sample text for each font. You can filter fonts to display only fonts from Adobe or favorites you’ve marked.
- Select the Snorkel Tours text layer in the Timeline panel.
- In the Properties panel, choose Calluna Sans Bold from the Font Family menu.
Tip
To select a font quickly, begin typing its name in the Font Family box. The Font Family menu jumps to the first font on your system that matches the letters you’ve typed. If a type layer is selected, the text in the Composition panel is formatted with the newly selected font.
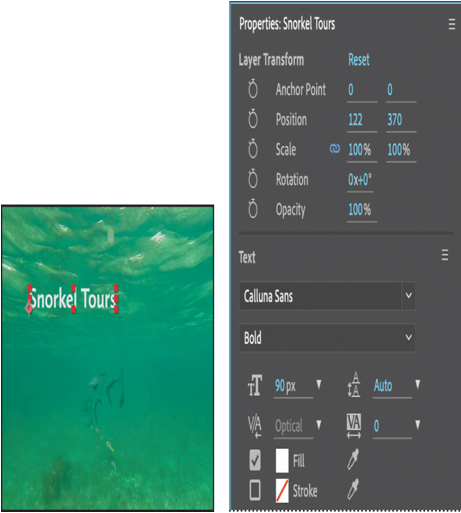
3. Set the Font Size to 90 pixels, and make sure no stroke is selected.
4. Leave all other options at their default settings.
Formatting paragraph attributes
Use the Paragraph section of the Properties panel to set options that apply to an entire paragraph, such as alignment, indentation, and leading. For point text, each line is a separate paragraph. You can set formatting options for a single paragraph, multiple paragraphs, or all paragraphs in a text layer. You just need to make one adjustment for this composition’s title text.
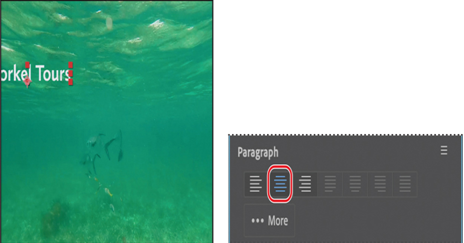
- In the Paragraph section of the Properties panel, click the Center Text button. This aligns horizontal text to the center of the layer, not to the center of the composition.
Note
Your screen may look different, depending on where you started typing.
2. Leave all other options at their default settings.
More DetailsJan 9, 2022
Installing a font using Adobe Fonts – Animating Text
Hundreds of fonts are available through Adobe Fonts, which is included with an Adobe Creative Cloud membership. You’ll use Adobe Fonts to install a font that will work well for the title text. When you install an Adobe Fonts font on your system, it’s available in any application.
1. Choose File > Add Fonts From Adobe.
After Effects opens the Adobe Fonts page in your default browser.
2. Make sure you’re signed in to Creative Cloud. If not, click Sign In at the top of the screen, and then enter your Adobe ID.
3. Type Snorkel Tours in the sample text field. If you don’t see all the text, move the slider to change the text size.
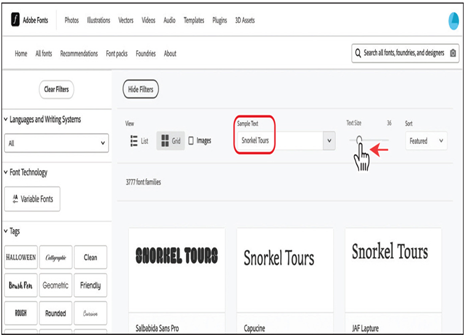
Using your own text as the sample text lets you get a feel for how a font will work in your project.
You can browse fonts on the Adobe Fonts website, but because there are so many, it’s often more efficient to filter them or to search for a specific font. You’ll filter fonts to see those that meet your requirements.
4. Choose Name from the Sort menu in the upper right corner. Then, on the left side of the page, hide the Tags area, and select Sans Serif in the Classification area. In the Properties area, select the buttons for medium weight, medium width, medium x-height, low contrast, and standard capitalization.
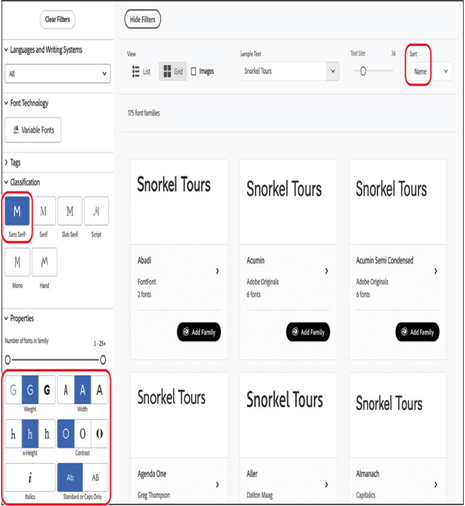
Adobe Fonts displays several fonts that meet the requirements you specified.
5. Browse a few pages’ worth of fonts to see what’s available. Calluna Sans, which is probably on the third page, will work nicely.
6. Click Calluna Sans.
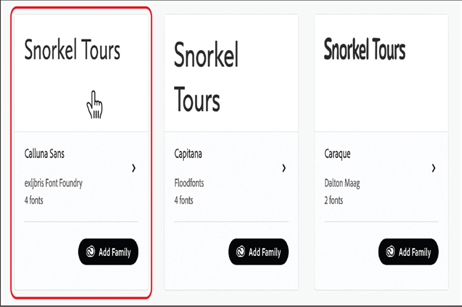
Adobe Fonts displays an image with the font in context and sample text for all the fonts in the selected family as well as additional information about the font.
7. Click Add Font next to the Regular and Bold versions of the font.
Note
Depending on your system and your Internet connection, it may take a few minutes for Adobe Fonts to activate your fonts.
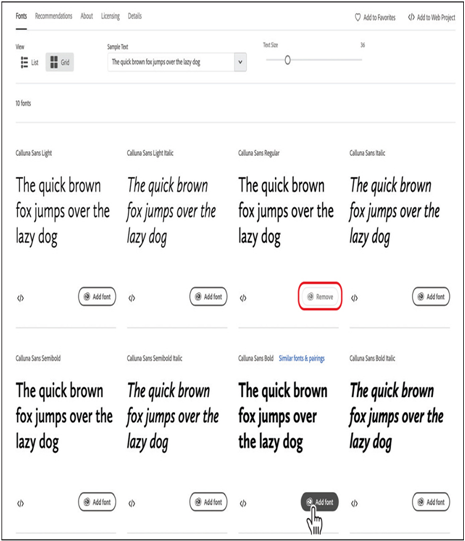
The selected fonts are automatically added to your system and are then available in any application, including After Effects. After you’ve activated your fonts, you can close Adobe Fonts and your browser.
More Details